Quantcast
Channel: Annielicious Food
Viewing all 110 articles
Browse latest View live

How to clean crabs

$
0
0
A small demonstration on one way to clean and cut a crab. 

Everyone has their own method to do. But this is how I did it for my Chilli Crab dish today.


Hainanese Chicken Rice (海南鸡饭) - (AFF - Singapore #1)

$
0
0
In conjunction with this month's Asian Food Fest, I cooked Hainanese Chicken Rice (海南鸡饭) for weekend lunch. This dish is very well known here in Singapore and it is considered one of the national dishes. You can find Hainanese Chicken Rice almost everywhere in Singapore!


Hainanese Chicken Rice is a dish adapted from early Chinese immigrants originally from the Hainan province in southern China. It is based on a well-known Hainanese dish called Wenchang Chicken (文昌雞), due to its adoption by the Hainanese overseas Chinese population in the Nanyang area. (Source : Wikipedia)


Bite-sized pieces of blanched white chicken, fragrant rice cooked in chicken broth, delicious ground chilli and spring onion ginger oil. And some likes going with dark soy sauce, some don't. These are common way of eating Hainanese Chicken Rice in Singapore.

This dish can be simple. But to make it good, you need some patience here. Everything starts from stepping into the market and select the freshest ingredients, picking the right Kampong Chicken (or Free Range Chicken), ensuring the rice is well cooked, and to prepare the condiments well.

My mom always says, Chicken Rice is a simple dish, but this probably can categorized as Kungfu dish (功夫菜). It means the dish is using simple ingredients, but to make it good, it needs alot of attention and every details must be well taken care of.

Chicken should be cooked very lightly, pink inside the bones, not too bloody, and with a gelatinous skin. I'm still learning :)


A lot of effort goes into the preparation of this flavorful dish, with effort of slowly blanching the chicken until it is fully cooked, before immediately soaking it in cold water. This stops the cooking process and ensures that the meat remains tender, and is also why the meat is usually served at room temperature. 

Ingredients 
(Source: My mother-Mdm Chai, her source is from a Hainanese Chicken Rice Stall's owner in SG)

The Chicken
  • 1 Kampong Chicken (or Free Range Chicken), estimated 1kg
  • 5 thick slice Old Ginger, about 35g
  • 2 cloves Garlic, bruised
  • 1 sprig Spring Onion, tied into a knot
  • 2300ml Water (or more)
  • 1 tbsp Sesame Oil
Rendering Chicken Fats 
  • 150g Chicken Fats / Skins
  • 1 tbsp Peanut Oil / Cooking Oil
The Rice
  • 475g Jasmine Rice (95%)
  • 25g Glutinous Rice (5%) (Trade secret)
  • 500ml Chicken Stock
  • 1 tsp Salt
  • 8 tbsp Rendered Chicken Fats (Or you can use shallot oil as alternative)
  • 4 strands of Pandan Leaf (Screwpine Leaf), tied into 2 knots
  • 1 stalk Lemon Grass, lightly bruised
  • 4 cloves Garlic, bruised
  • 2 thumb sized Old Ginger, sliced
  • 2 tsp Planta / Margarine (Optional. I didn't use and I don't recommend) (Trade secret)
The Chilli
  • 3 cloves Garlic
  • 3 Red Chilli
  • 2 Bird Eye Chilli / Cili Padi
  • 1 thumb sized Young Ginger
  • Juice from 3 to 4 Small Calamansi
  • ½ tsp Salt, or more to taste
  • ½ tsp Sugar, or more to taste
  • ¼ tsp MSG (Optional - I didn't use)
  • 1 to 2 tbsp Chicken stock to dilute it. But I'd prefer 2 tbsp Rendered Chicken Oil
  • 1 tsp DelMonte Ketchup (Optional) (Trade secret)
Spring Onion and Ginger Oil (Optional)
  • 100g Old Ginger
  • 25g Spring Onions (or more)
  • 2 tbsp Rendered Chicken Oil
  • 1 tbsp Sesame Oil
  • ½ tsp Salt, or more to taste
  • ½ tsp Sugar, or more to taste
  • ¼ tsp Chicken Powder (Optional - I didn't use)
Dark Soy Sauce
  • 20g Rock Sugar
  • 30ml Water
  • 50ml Dark Soya Sauce
Dressing for the chicken
  • ½ thumb sized Rock Sugar (Trade secret)
  • 2 tbsp Light Soy Sauce
  • 1 tbsp Shao Xing Wine (绍兴酒), also known as Hua Tiao Wine
  • 1 tbsp Sesame Oil
Garnishing
  • Coriander
  • Sping Onions
  • Cucumber, sliced
Alot of effort goes into the preparation of this flavorful dish yea.

Method - The Chicken
  1. Wash and trim any visible fat from the chicken. Cut away the chicken feet. Stuff old ginger, garlic, spring onions into the cavity of the chicken. 
  2. Bring water to a boil. Once water is boiled, hold the chicken head (refer to photo), soak the chicken body into the boiling water. With your hand still holding the chicken head, lift the chicken up, and soak it into the boiling water again. Do this for 4 times before you release the chicken head and let the chicken soak into the water completely. By doing this, water will go into the chicken cavity completely. This is to ensure that the whole chicken is well cooked.
  3. Keep an eye on the pot. Once you see the water is boiling again, turn to very low heat for 5 mins, and then heat off. Let the chicken sit inside the hot water untouched and covered for 30mins. If your chicken is big, you might need another 5 mins or so. For this part, you have to gauge it on your own. Prepare a tub of ice-cold water, preferably with ice cubes. 
  4. Once chicken is cooked, using chopsticks, gently remove the chicken from the water and place the chicken into a tub of tap water, let the tap water running for 10mins. And then, transfer the chicken to the tub of ice-cold water.
  5. Once chicken is completely cooled, drain. Apply 1 tbsp Sesame Oil on the chicken skin. Set aside.

Method - Rendering Chicken Fats
  1. Roughly chop the chicken fats and skin. 
  2. In a small sauce pan, heat up peanut oil, and add in the chicken fats and skin. Let it cook over very low heat for 30 mins (or upto 1 hour) until the liquid fat renders away. Pour off and keep the liquid fats for later use. You may discard the crispy chicken fats.

Method - The Rice
  1. Wash the rice well, and soak it for 1.5hrs, drained.
  2. In a large saucepan over medium heat, heat up 8 tbsp rendered chicken fats. 
  3. Add the garlic, ginger, lemongrass. Fry till fragrant and golden brown. Remove from the oil. 
  4. Add one knot of pandan leaf. Fry till fragrant. Remove from the oil. 
  5. Turn off the heat. Add in Planta (Optional), drained rice. Give it a good mix, until the rice are all well coated with the flavorful oil. 
  6. Transfer the rice into rice cooker. Add in 500ml reserved chicken stock and salt. Stir well. Throw in the 2nd Pandan leaf knot. Cook the rice in a rice cooker or by your preferred method of cooking rice. 
  7. Once rice is cooked. Remove pandan leaf knot. Loosen the rice with chopsticks and give it a mix. Cover the rice, and let it sit in the rice cooker for another 10mins before serving. The texture of rice is important and it takes quite a bit of experience to get it done properly. 
Method - The Chilli
  1. Combine all chillies, ginger, garlic, sugar, salt in a food processor and blitz away.
  2. Add in calamansi juice and 1 to 2 tbsp chicken stock to dilute it. But I prefer to use 2 tbsp hot Rendered Chicken Oil instead.
  3. Add in MSG and DelMonte Ketchup. Stir well. Set aside.
Method - Spring Onion and Ginger Oil
  1. Blitz ginger into paste in a food processor. 
  2. Heat the rendered chicken oil and sesame oil in a small frying pan. 
  3. When the oil is hot enough (at it's smoking point), add in ginger paste. Fry well for 2 to 3mins. 
  4. Add in spring onion, salt, sugar, chicken powder. Give it a quick stir. Heat off. Set aside and leave to infuse. 
Method - Dark Soy Sauce
  1. In a small saucepan, boil rock sugar and water under low heat till completely melted and viscous. 
  2. Add in dark soy sauce, continue to cook till it thickens. Remove and leave it till completely cooled.
Method - Dressing for the chicken
  1. In a small saucepan, boil rock sugar, soy sauce and Shao Xing wine under low heat till completely melted and viscous. Heat off.
  2. Add in sesame oil. Stir well. Remove and set aside. 
To Serve
  1. Chop the chicken, Chinese-style. Arrange it on a plate. Pour the dressing over it. Scatter with a little coriander. 
  2. Serve with hot chicken rice, condiments, broth and garnishes.

Here's some notes that you need take into consideration. 
  1. Use a tall and slim pot to cook the water for blanching chicken. This is to ensure you use the minimum amount of water, just enough to submerge the chicken. Like that, you will have a better flavor chicken stock to cook the rice later. 
  2. Try to buy Kampong Chicken from Sheng Siong. They sell good and genuine black leg Kampong Chicken.
  3. If you think rendered chicken fats is unhealthy, you'd probably didn't know that you actually ate loads of them when you eat chicken rice at the hawker centre. Without them, you won't like your chicken rice. So, just do it. You can get chicken fats / skins from Sheng Siong super mart. Or simply ask the chicken seller at the wet-market. Sometimes they gave it away for free. 
  4. 95% Jasmine Rice + 5% Glutinous Rice is really a trade secret. Rice suppliers pre-mixed the rice ratio before they send to the chicken rice stall. 
  5. Planta / Margarine too, is another trade secret. It gives the chicken rice a nice color. However, I didn't use it because I'm cooking it for my family. I don't need them. And this also explains why the color of my chicken rice looked abit to the pale side. 
  6. It's not surprising that there's MSG in the chilli sauce. But I was amazed when my mom told me that DelMonte Ketchup is used for the chilli sauce. But well, this is for chicken rice stall to do business tho.
  7. Spring Onion and Ginger Oil is NOT AVAILABLE in every chicken rice stall in Singapore. Only bare minimum of them is still having this condiment. Some only serve ginger paste with oil. Cost is also one of the factor for them for not maintaining it. Hence, till now, there's an argument point that Spring Onion and Ginger Oil shouldn't exist in Hainanese Chicken Rice dish. Oh well. It's up to you :)
  8. Some says dark soya sauce plays an important part for Singapore Hainanese Chicken Rice. I confess, and I admit. I forgot to prepare the dark soy sauce. Too busy and too focused on the chicken and the rice. Damn it!
  9. Rock sugar makes a difference to the dressing for the chicken. If you could, please stick to rock sugar.
  10. The rest is just a matter of blending the ingredients and then adding seasonings, oil and stock. Making these sauces from scratch gives full authenticity to the recipe.

Although Hainanese Chicken Rice stalls in Singapore is selling lip-smacking delicious chicken rice. I'd tried my very best to note down every single thing my mom told me. This recipe may not produce exactly the same result as store-bought chicken rice. This might be due to the recipe that I've written above might have tweaked to adjust to my own agaration (estimation). I see a room to evolve further in years to come.There are some ingredients (eg. Planta/Margarine or MSG or DelMonte Ketchup) is an optional. Since we are cooking for our family, just do it whenever you feels comfortable. If you feel that there's no need to add them, just go without them. I'd prefer original taste.


I personally quite happy with it for now. Maybe I should find a day to try some other well known chicken rice in Singapore (eg. Chatterbox?), or until I found another inspiration for further modifications to it.

Do share with me if you have any better recipe :)


I am submitting this post to Asian Food Fest (Singapore) – September Month hosted by Grace Phua of Life can be Simple

BEST Singapore Chilli Crab (辣椒螃蟹) - (AFF - Singapore #2)

$
0
0
When one mention Singapore, who doesn't know Chilli crab? This popular seafood dish had been around since 1956. Fresh crabs stir-fried in a semi-thick. sweet, tangy, savory, tomato and chilli based sauce which will electrify your palate and satisfy your tastebuds.

Arguably one of Singapore's greatest culinary inventions. If you are a fan of seafood, this is one dish that you must try while you're in Singapore.


Don't get cheated by it's red and spicy look. Despite its name, chilli crab is NOT a very spicy dish.

The spicy and tangy sauce is made deliciously fragrant with rempah (spices) and lime or calamansi juice, while corn starch and egg ribbons are added to give the chilli crab dish the fluffy texture at the end of the cooking process. For extra oomph, order some fried mantou to scoop up the thick gravy, which will leave you hankering for more.


I adapted this recipe from Chef Master Classes on his World's BEST Singapore Chilli Crab Recipe, which he mentioned that his recipe is based on a food trip to Punggol Point, Singapore. I don't know how BEST this recipe would be. But by reading the recipe list, I think I wanna use this recipe as a reference. Also, Violet Oon is the brand ambassador of Singapore Food. So, her recipe as a guide will never go wrong I guess.

Ingredients
(Source : Chef Master Classes & Violet Oon's recipe, as a guide, with modification)
  • 2 Mud Crabs or Meat Crabs (or Roe Crabs if you wish) - about 800g each
  • 1 portion Rempah (Refer to below for recipe)
  • 6 tbsp Tomato Ketchup
  • 3 tbsp Sugar
  • ½ tsp Salt
  • 1 tsp Tau Cheo (fermented bean paste)
  • 1½ tsp Corn Flour / Tapioca Flour + 1½ tbsp Water
  • 5 tbsp Peanut Oil
  • 1 cup Water (or more)
  • 2 eggs, beaten
  • some chinese parsley (garnishing)
  • some chillies (garnishing)
  • some spring onions (garnishing)
Accompaniment 
  • Mantous (馒头)  from the supermarket frozen section, thawed. 
  • Enough oil for deep-frying the Mantous (Mixture of 1 : 1 ratio of Butter + Peanut Oil)  


For the rempah (Spices)
  • 6 Shallots
  • 6 Garlic
  • 5 Red Chillies
  • 2 to 3 Bird Eye Chillies, depends on individual
  • 2 Candle Nut
  • 1 thumb sized Galangal (or replaced by Ginger if you don't have Galangal)
  • ½ Green Lime, extract the juices (or use calamansi as alternative)
  • 2 tbsp Belacan Powder (toast your own belacan if you can't find belacan powder)
To prepare the rempah : Put everything in the chopper and blitz away until fine texture is achieved.


To prepare the crab, I'd posted How to clean crabs video last month. Or, below photos shows you roughly how it is cleaned and prepared. And preparing crabs is NOT as difficult as what you imagined. Be COURAGEOUS!!!


Get everything ready before start cooking is the rule. Always remember. Cooking chilli crab is not difficult. But preparing needs time.

Cooking Method 
  1. Heat oil in a wok until very hot. Fry rempah until fragrant. 
  2. Add tau cheo, sugar, salt and tomato ketchup. Stir well. 
  3. Add in crabs, stir well. Then, add water, stir, cover until crab shells turned bright red, indicating that the crab is cooked. 
  4. Beat 2 eggs in a bowl, pour into the sauce at the side, gently mix well. Simmer for another 10 seconds, 
  5. Heat off, dish up, garnish with coriander, spring onions and chillies. Serve with hot deep fried mantous.

This recipe is good. It's a little messy, but worth it for sure. And you can always vary the recipe to your taste. You want it sweeter? Spicier? It's up to you! :)

Max and I scarfed the whole plate of crabs down with all the mantous. It tastes so good with deep fried mantous and it is also good with a bowl of hot rice!


Yummmss!!! Definitely recommended!


Do share with me if you have any better recipe :)


I am submitting this post to Asian Food Fest (Singapore) – September Month hosted by Grace Phua of Life can be Simple

Salmon Fish Bone Tofu Soup (三文鱼骨豆腐汤)

$
0
0
Milky and light brown fish soup, full of flavor and packed with nutritious goodness. This is what I cooked for my family for dinner tonight. Not only the fish head, there's alot of fish bones in it too! Especially my skinny Mother-In-Law needs alot of nutrients now. Like Calcium, Omega and other goodness. All in this pot of soup.

On a side note... This soup is NOT FISHY all. It depends on how you cook it.


This soup is indeed nutritious, delicious and versatile. You may replace with your favorite vegetables in this recipe. Besides, having a warm fish soup is so comforting especially during the cold season.

I spotted some really fresh Salmon fish head and bones at Chinatown wet market today. Fish monger packed them into a big pack and selling it to me at S$8.00. There's quite alot of meat in the heads and the bones actually. For those who often cook fish soup will know fish bones and head has lots of flavor.

And this is how I prepare this soup....

To prepare :

1. Gently, give the fish head and bones a quick wash. Drain them using kitchen towel. Yes, you will need quite alot of kitchen towels to do the work. But if you did it well, it would make pan-frying easier. Wet fish will makes your pan-frying fish experience turned disaster.


2. Heat up some oil in a wok, add in few slices of ginger, sprinkle some salt. Under medium fire, pan fry the fish head and bones until lightly browned. You don't have to put too much oil. Salmon itself is oily. It will release oil on its own.


3. Let the fish rest on the paper towel to drain up some excess oil.


S$8.00 for all above fish bones and head is definitely too much for today. I divided them into two portion. 1 portion eat fresh, another portion wrap well and freeze away for next week. This means I only paid S$4.00 fish bones and head for 1 recipe.

Ingredients
(Source : Annielicious Food)

  • Some Salmon fish head and fish bones, about S$4.00
  • 2 thumb sized ginger, sliced
  • 2 cloves garlic, smashed 
  • 1 block of firm tofu
  • 6 stalks of dried mushrooms, soaked till soft
  • 1 stalk of leek
  • slices of daikon
  • 1 tbsp black peppercorn, crushed
  • 1 bird's eye chilli
  • a kettle of hot boiling water... This is important
  • thumb sized rock sugar... This is important
  • 1 tbsp fish sauce
  • 2 tbsp Shao Xing Wine (Chinese cooking wine)
  • dashes of pepper
  • Salt to taste
for garnishing
  • some Spring onions
  • some Coriander

As I mentioned earlier, you may replace with your preferred vegetables. If you don't like Salmon, you can use Threadfin bones too. Add in more ginger if your tolerance of fishy smell is low. But as I said right at the beginning, this fish soup is not fishy at all. But that's provided you follow my instructions.

But I have to confess that pan-frying the salmon fish bones do makes your kitchen  smells fishy. It's unavoidable. If you pan-frying fish at home before,  you will know what I mean. So, your kitchen do smells fishy after pan-frying the fish bones. But the soup won't taste fishy. Is that clear now?


Method :

  1. Boil a pot of water. We need hot BOILING water. Don't use room temperature water. 
  2. In a pot or a casserole, heat up a tsp oil, fry the ginger and garlic till fragrant. Add in pan-fried fish bones and head. Cover up with lid, let it fry for 5 to 7 minutes or until the fish bones and head is well heated up. Keep an eye on it, and don't burnt them.
  3. Add in the hot boiling water until the water covers the fish head and bones. This is important. You have to follow this if you wants milky looking fish soup.
  4. Add chinese mushrooms and black peppercorn. Turn fire to high heat and let it boil for 10mins. And then, add tofu, turn to medium low heat, and boil for another 10mins. 
  5. Remove any scums and oil floated on top of the soup during boiling process. Don't be lazy. Try to keep as little oil as you can in the soup.  
  6. Add shao xing wine, rock sugar, fish sauce, and salt. Give it a stir. Taste.
  7. Add in daikon slices and bird's eye chilli, cover lid, continue to boil for another 10mins. Taste the soup, add more salt if needed. Once it is okay, heat off, and leave it there. 
  8. Until you are ready for the meal, reheat the soup, garnish with spring onions and coriander.


Add in the hot boiling water into the the pan-fried bones gives milky looking fish soup base. If you use room temperature water, you might not be able to achieve what you want. I need to re-emphasize, it is HOT BOILING WATER. Don't give me lukewarm water or whatever nots.


Boil the fish head and bones under high heat at the first 10 minutes is also part of the trick that gives milky appearance soup result.


Ooohhh,.. Look at the milky and light brown color! Is this what you want to achieve? If yes, please DO NOT skip any steps that I mentioned earlier. My soup looked clean and very little oil.


Flavorful fish bones soup and some vegetables. Yes, this is simple, economical and absolutely delicious. You don't have to dry up your wallet to eat well.

I still remember how my mother-in-law complaint to me about the fishy smell on her salmon fish bones soup that she tried cooking months ago while I'm away from home. Today, she's actually savoring every last drop of broth in her bowl. I'm glad.


I hope you like it.

Comin' up... I will come up with some Chinese New Year dish. Stay tuned!

Kueh Bangkit (Melt-In-Mouth Coconut Cookies)

$
0
0
Max asked for Kueh Bangkit this year. When I asked him to describe what kind of specific bangkit he wants, he says "You know? That sweet-powdery softness and warms your mouth with the fragrance of pandan and packed with coconut flavor?"

Ohh,,, he has a specific request!


Ever since I started learning baking, Kueh Bangkit was never on my to-bake list. Not until Max asked me to do so. Kueh Bangkit is one of his favorite Chinese New Year cookies. Obviously (refer to above on how he describe that)

In my childhood memory, my faint recall was that Kueh Bangkit is sweet, chalky, packed with coconut flavor, and melt-in-mouth. When I said melt, it really melts IMMEDIATELY in the mouth. The moment the cookies touches the tongue, it melts. Yes. That's the one! 


When I grew up, moved to Singapore for work, everything has turned commercialized. Unlike my home-town Kampar that sells home-made cookies during my childhood times. They do, still have some in Singapore, but really good ones? You've got to be lucky to find one. I started to dislike Kueh Bangkit ever since store-bought bangkits invaded the market. Bangkits displayed on the supermarket or neighbourhood bakeries didn't attract me at all. This is where I stopped having interest on Bangkit. 

I tell myself, if I want to make, I will make the one that makes me find back at least 70% of my faint childhood feel (probably). If not, I won't consider my bangkit a success. So, this post is to share with you my experience on my attempts on Kueh Bangkit.  


As usual, before I start experimenting something, I will make sure I do some reading. I flipped through some cookbooks, check out the online recipes. Comparing the liquid and dry ingredients ratio, I finally settled with fatboo's recipe that sounds really convincing. 

Some people tells me that Kueh Bangkit is easy to make. But mind you, they are easy to fail too. So, becareful on that. To ensure my first attempt a success, I followed the recipe obediently without tweaking it. This also means, I followed the particular ingredients (and the brand) mentioned on the recipe. Only on the 2nd and 3rd attempt, I then tweaked the recipe abit. So, please... be good. For best chances of success, just follow as I said. 


This recipe ask for Ayam Brand Premium Coconut Cream and Sago Flour. Max hunt these two ingredients up and down for me and it is not avail. We managed to found Sago Flour at Sheng Siong Clementi. For the coconut cream, he is so smart enough to call Ayam Brand Singapore to ask for it. Later, we learnt that Ayam Brand Premium Coconut Cream is named as Pure Coconut Cream in Singapore. So, same content, different name I guess. According to Ayam Brand staff, this particular Coconut Cream gives the most similar quality as the freshly squeezed coconut milk in the market. It contains nothing else except coconut cream (no stabilizer).  

DISCLAIMER : This is NOT a sponsored post. Because this Coconut Cream really brings out its good flavor. I feel that I should credit and recommend this coconut cream to you guys to ensure higher chances of success in attempt. And please remember, this recipe ask for coconut CREAM, not coconut milk. Becareful. 


Ingredients
(Source : Fatboo, with modification after my 3rd attempt)
  • 800g Sago Flour (2 packs of 400gm)
  • 10 to 12 Pandan Leaves (Screwpine Leaves)
  • 240gm Ayam Brand Pure Coconut Cream
  • 300gm Icing Sugar (Originally ask for 200gm) *See Note
  • 3 Egg yolks (medium sized eggs 50 - 55g)
  • Drops of Red coloring (optional)
Note : 
  1. I increased Icing sugar from 200g to 300g Icing Sugar on my 2nd and 3rd attempt, and I swear that it does taste better! The existence of Sugar enhances the coconut flavor.   
  2. This recipe makes approx. 330 Bangkits, depends on the cookies thickness. I've got 220 out of this recipe. So, I assume that my cookies is thicker than Fatboo's one. 
  3. The existence of red coloring is to add some festive feel to the overall look of the bangkit. It's absolutely optional.  

Flour Preparation

10 - 12 Pandan Leaves : Wash and wipe with paper towels till dry. Cut into desired lengths. 

800g Sago Flour: In a big wok, fry sago flour over low heat for 10 mins. Stirring all the time to ensure the flour is not burnt. The initial frying stage would be lumpy and hard to stir. 

Cut Pandan Leaves: Add it into the flour and continue to fry another 10mins till flour is light and the pandan leaves are dried and crinkled. The flour will become dry and flies up when stirred. This indicates that the flour is ready. 

Note : 
  1. You may not be able to finish the Sago Flour at the end of the baking process. But it's better to prepare more as some will be used for managing the dough, flouring the pastry board and so on. Read on, experience it, and you will know. 
  2. You can prepare the flour one day in advance (or upto 5 days in advance), as the flour needs to cool down completely before you can use them. 
  3. It is highly advisable to leave the fried sago flour overnight to ensure that it is completely cooled. Once it is cooled, sift and store the prepared flour in air-tight container.


Pastry Preparation

1) In one bowl, stir 240gm Coconut Cream and 200gm Icing Sugar with hand whisk till sugar dissolved and mixture turned semi-greyish thick sugary solution.

2) In another bowl, whisk 3 Egg Yolks and the remaining 100gm Icing Sugar under high speed till creamy white and sugar is dissolved.

3) Lower speed, add in (3) coconut sugar solution and whisk till well mixed.

4) With a wooden spatula, add in 560gm Fried Sago Flour, still till well mixed. *See Photo

5) Cover the dough with a piece of wet cloth to prevent pastry from drying out, let the dough rest awhile.


You only need to mix 560gm Fried Sago Flour into the wet mixture. The rest of the fried sago flour is for you to dust the working top, adding more flour to the sticky dough, dust the rolling pin, and everything else. The pastry is VERY STICKY. In my first attempt, I thought somewhere went wrong, I was worried through the entire experiment as it's not easy to handle.


Rolling and Cutting the Pastry

1) Line pastry board with a piece of clingwrap to prevent it from sticking.

2) Working with a cake scrapper, cut out 1/3 portion of the sticky pastry, sprinkle some fried sago flour over, knead in. You need to add in flour bit by bit till pastry is smooth, soft and pliable.

3) Flour worktop, place pastry on it, roll dough out to to your desired thickness. For all my 3 attempts, I conclude that 6mm thickness is ideal for my personal preference.

4) With cookie cutter, cut out the bangkit, place it on a lined baking tray.

5) Using a skewer or a toothpick, put a tiny dot of red color on the bangkit to give this cookies an overall festive feel.


Baking

Bake in pre-heated oven at 160 degree for 10mins. This initial 10mins is to allow the bangkit to set the design.
Then, reduce the temperature to 130 degree, and continue to bake for a further 10 to 15 mins or till Bangkit is very light beige in color. Keep an eye on it. Gauge it yourself. Your oven and my oven temperament might not be the same.

In the original recipe, it mentioned 160 degree for 10mins and 130 degree for 20mins. I tried, but I think 10mins + 10mins is sufficient. So, always feel it yourself. Because your bangkit thickness might be different from mine.


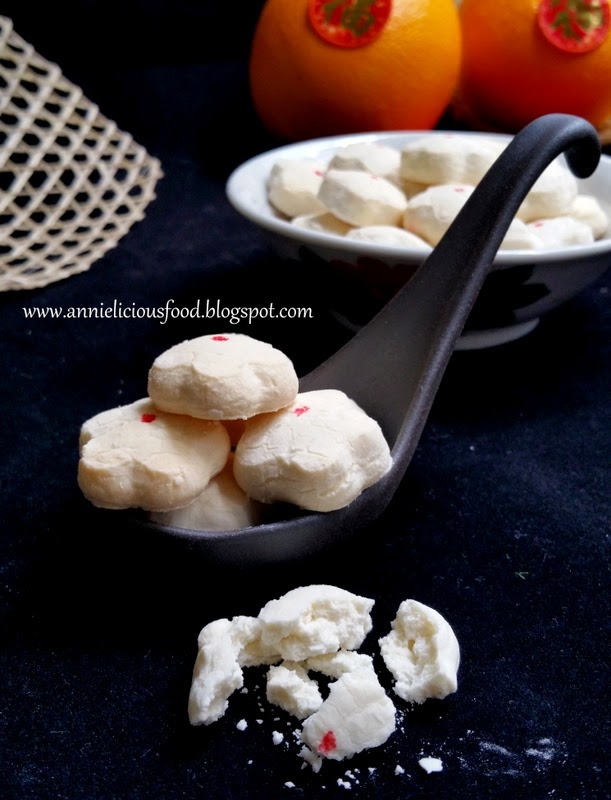
And this is how it looked when it is out of the oven, The hairline cracks on top of the cookies looked quite nice tho. And the little red dot makes the whole bangkit looked nice. I like!


It takes me 3 attempts to understand certain tricks. I learn new things in every baking experiment. For this bangkit, here's my sharing ...

My 1st attempt : Followed the original recipe obediently. Taste and smells good, but not sweet enough to my liking. Fragile cookies, definitely need alot of tender-loving-care. And it does melt-in-the-mouth very quickly as promised. I'm satisfied, and I consider this a success. Max says this gives him childhood feel. I don't know how true.

My 2nd attempt : I tried tweaking the recipe by using 80% sago flour and 20% tapioca flour, and increased sugar from 200g to 300g. The result, taste and smells better with the enhancement in sweetness. But cookies texture is not what I expected. The cookies is 'crunchy'! And yes, it does melt-in-the-mouth, but it melts VERY slowly... Duh! I don't know why, but I consider this is a failure because the cookies texture is not what I wanted. My MIL literally 'promote' it to her friends who came to our house. And I also don't know why this failed bangkit is a crowd pleaser. *face-palm*

My 3rd attempt : This is the recipe written as above. 100% sago flour, 300g sugar. Result was satisfactory. Cukup lemak, cukup wangi, cukup manis (literally means enough of coconuty, enough of sweetness, and nice fragrance in Malay). Although the cookies is still on the fragile side, they are better than the 1st attempt. But to be honest, you can't expect tough cookies to give you melt-in-the-mouth feel. Usually fragile cookies does. That's the logic I guess. I found the 'feel' on my 3rd attempt. And also, I'd say this is a success!


Kudos to this recipe. These cookies are good and well received. Definitely better than store-bought. I guarantee you this for sure. And yes, I repeat myself again, it does melt-in-the-mouth quicky! I have to say, I love this recipe, I really do.

But is this the perfect recipe? Maybe yes to me, but maybe no to others. I will continue to search for a perfect ones. If you do have one, please do share with me. Ok?


And a quick tips for you. When you arrange the cookies into the container, use chopsticks to do the work, With my clumsy fingers, I just couldn't control it well, I damaged a few cookies during the process. And I quickly use chopsticks to do the rest of the cookies arrangements.


I hope you like this recipe. And if you do, please go ahead and share this recipe with your friends and relatives.

In this New Year, may good luck and prosperity follow everyone of you. Happy New Year everyone!!!

Annielicious Food Blogspot is 3 now!!!

$
0
0
Dear Readers, 

Today marked the 3rd year anniversary ever since I started writing Annielicious Food Blogspot.


For those who know me, you will know how hard I'd been trying to find work / life balance all along. For those who doesn't know me, for your info, I have a full-time job, and blogging recipes will only happen over the weekend. The intention of writing this blog is for my personal record, my way of penning down some of my tried and tested recipes, hoping to share knowledge with my future children (if I'd ever have one). If I'd grow old one day, I would worry that I'd forgotten what I've added into the dish and I'm not able to do knowledge transfer to my child.

And so, I never thought my recipes could go any further. But, I started to feel the change in society. Modern women's doesn't walk into the kitchen as much as our parent's era do. Eating out is so convenient nowadays. But I'm a person who always believes in... as long as there's food on the dining table, your family members will come home for you. 

I asked myself how much I could do to change it? At least some little effort from me? How I could encourage fellow young women's in this modern society to cook and bring some joy to their family? I thought, maybe improve my way of writing my blog to ensure every details are recorded down? I don't know. But this might be one possible or better way to encourage readers to start cooking. But at the same time, things are getting tougher when my I set expectations on myself in writing recipes. I read more, I learn more, and I'm still learning. And you guys are the one who gave me the reason to do this. 

My writing is not detailed enough is something I worry always. I don't know why. But if you wonder what I did in order to come up with a recipe post? Read this :
  1. Finding the right weekend schedule to cook (I'm not a full-time blogger)
  2. The right time to go to the right place or market to get the fresh ingredients (Sometimes I need to run a few places just to gather all the specific ingredients I wanted), 
  3. The right amount of food to prepare for the total hungry tummies,
  4. The right cooking or baking heat and time (Especially first attempt on new dishes or bakes),
  5. Penning down every possible details in the kitchen to ensure nothing is forgotten later,
  6. Take photos of every preparation and cooking steps, while ensuring my food is not over-cooked (I have poor memory sometimes),
  7. Wishing for the best natural light to take better photos (If the sunlight is not good on that day, it kills the photo taking, and it's as good as killing me!), 
  8. Photo taking must be quick, so as to ensure hungry tummies doesn't eat cold dishes, 
  9. Time spent on photo editing and writing every details on the blog (It's quite time-consuming actually).
  10. Proof-reading before hitting the "Publish" button, so as to ensure no wrong information is written (although I admit that I didn't do proof-reading during busy times)
  11. Did I left out anything?
The road is never easy, but till now, I'm still learning.... 


I'm surprised that I'd actually able to persevere until now, and still, continue blogging recipes. But looking back, I don't think this blog is possible without these people :

My Husband, Max - He is the driver who drives me around to source for ingredients without even complain once until today. He is the supporter, the encouragement, the guinea pig, the audience, the judge, and my biggest fan! He would finish all the left-over food that I cooked. He spoilt me with lots of kitchen toys, wash all the dishes after I messed the kitchen (this is unconditional love!). He can even go all way out to buy good ingredients for me wherever he go. The time when he lugged 1kg of Prosciutto Di Parma from Germany. Ohh... I love this man more than my life!

My Mother, Mdm Chai - She gave me lots of classic recipes, cooking tips that doesn't teach on cookbooks and online. Her recipe always appear on my blog if you noticed. She taught me lots of lessons in life that can never be found in textbooks. She's my absolute inspiration and aspiration!

My Mother-In-Law, Mdm Leong - She always loves promoting my cooks and bakes to her friends. Although sometimes I couldn't understand why she'd want to give-away my failed bakes (yes, I do fail sometimes, I'm not afraid to tell you.), but I know she'd probably feels proud of her daughter-in-law who bake, cook, and write. 

Alan, Travelling Foodies - This guy is the best (male) cook that I've ever met in SG so far. Very detailed and precise person in cooking and baking. I've learnt alot from him. And not to mention, he'd probably the one who's there to listen to most of my nonsensicality and ranting through the entire 3 years of blogging. Developing a strong friendship is never easy and it takes alot of effort. Thank you for being with me through good and bad times, my friend. I love you man! 

Wendy, Wendyinkk Blogspot- This woman is amazing! She's my most respected recipe blogger ever! If I were to nominate someone to go for Master Chef competition, she would be the one. We have complicated relationship here. She is my school-mate, my senior in Secondary School Girl's Brigade. Her mom knows some of my family member during our young days. Back in 2012, we found each other on Facebook, we reunite, and she is the one who encourage me to start writing down my recipe on blogspot. She taught me alot along the way. She seems to know everything that I can't even find it online! She pushed me hard to learn even more! I love you Wendy!

All Readers - Thank you for loving my recipe. Knowing that my recipe may not be the best, but you guys choose to believe me and give it a try. Everytime when I receive feedback from you guys, telling me how much your family members enjoyed the food, it makes me smile, and all the tough times (being a recipe blogger) is all gone. With both palms pressed together, I thank every one of you. 

Coming forward, I wish I would have more time to come up with more recipes and many more years to come. It is about how much I could do to encourage women in the society to cook and bring joy to their family. Thank you everyone for loving me. 


Lots of Love, 
Annie Mok

客家板麺 Malaysian Hakka Pan Mee

$
0
0
Do you prefer Pan Mee or Mee-Hoon-Kuay?

Some says they are the same. Some argues that they are different, but that's due to the shape of the noodles. Pan Mee (
板麺pronounced as Ban Mian in mandarin) is a Hakka-Style noodle, originating from Malaysia. Some translate it as "flat flour noodle", while some, translate it as "board noodle".

Flour hand-kneaded into dough traditionally torn into smaller pieces of dough by hand, but such laborious work is conveniently replaced by machine that can produce variety of shapes. Pan Mee typically served in soup, together with dried anchovies, minced pork, mushrooms and leafy vegetables. In my hometown, 树仔菜 (aka pucuk manis / manicai 马尼菜) is used.

My grandmother used to cook this delicious noodles for us. Usually she will let us have our choices of Pan Mee or mee-hoon-kway, and she will prepare the dough accordingly. That's one of the sweetest childhood memory. All she need is pack of flour, some anchovies and vegetables. She can cook up a comforting bowl of soup dish for everyone in the house. My grandmother has 12 child. My mom is the youngest, the last amongst the 12th. I haven't even tell you the number of grandchild she have. You can imagine that now. My grandmother is a wonder woman!


Because this is a very simple noodle soup dish, the soup plays a very important role in the preparation of Pan Mee. I've seen variations in soup base preparations. But for my grandmother, she use only dried anchovies and soya bean for the soup. Yes. Only two ingredients, but it makes great and flavorful soup base. Sometimes, the simpler it is, the better it taste.

I'm very straightforward and I'm not afraid to tell you. I don't have my grandma's exact recipe. I only vaguely remember what are the main ingredients my grandma use. I found Alan's recipe is the closest to my grandma's simplicity. So, I just followed, but with minor modifications.
Ingredients (Serves 4)
(Source : Alan, with slight modification)

for Soup
  • 65g Dried Anchovies (aka Ikan Bilis 江鱼仔)
  • 180g Soya Beans (黄豆)
  • 10 cups of water
  • 1 tsp salt (adjust to taste)
for Noodles
  • 250g Plain Flour or All-Purpose Flour 
  • 2 Eggs
  • 1/4 tsp Sea Salt
  • 5-7 tbsp water, adjust according to dough texture
  • 1 tbsp cooking oil 
  • flour for dusting
for Minced Meat Sauce
  • 300g Minced Pork (绞肉), preferably ground pork belly
  • 4 Chinese Mushrooms (香菇), soaked till soft, cut into strips
  • 2 Black Wood Ear Fungus (黑木耳), soaked till soft, cut into strips
  • 4 cloves Garlic, peeled, chopped finely
  • 5 Shallots, peeled, chopped finely
  • 2 tbsp Oil
  • 2 tbsp Dark Soya Sauce
  • 1/2 tbsp Oyster Sauce, adjust to taste
  • 1/2 tbsp Sugar, adjust to taste
  • 1/2 tsp Pepper
  • 1 tsp Corn Flour, to be mixed with mushroom soaking water
other ingredients
  • a bunch of 树仔菜 (aka pucuk manis) or Choy Sum 菜心 or any of your favorite green leafy vegetables that serves 4 sharing. 
  • 4 Eggs
  • Fried crispy anchovies 
  • Fried crispy shallots (optional)

Variation
  1. For the soup, there are some Pan Mee sellers likes to add pork bones into the soup to create extra sweetness. Some uses soya beans, some don't. But the general rule is... dried anchovies should be there.
  2. My grandma will only provide minced meat sauce and eggs when her budget allows. Eggs are usually cracked onto the soup and cook together with the noodles. It would be too costly for her to add eggs on every serving. 
  3. I personally prefers 树仔菜 (aka pucuk manis), but when first preference is not available, I shall go for my alternative Choy Sum 菜心.
  4. Fried crispy shallots is optional. But most Pan Mee stalls provide this topping. 

Method (for the soup)
  1. Give dried anchovies and soya beans a quick rinse.
  2. Soak soya bean in hot water for 20mins. Using both finger tips, rub away the skin from the soya beans. This is quite tedious. You can choose to skip this step if you are feeling lazy. 
  3. In a large soup pot, add 2 tbsp of cooking oil, add in anchovies, stir fry anchovies till fragrant. 
  4. Add in water and prepared soya beans, and bring to a boil. Lower flame to simmer with lid on for 20mins. Season with salt, turn off flame and leave to steep. 

Using both finger tips rub away the skin from the soya beans.


Stir fry anchovies till fragrant before adding in water. Fried anchovies will give you more flavorful soup.

Method(for the noodles)
  1. Combine flour and salt in a large mixing bowl. Form a 'well' in the middle and crack in the eggs.
  2. Add cooking oil and begin to combine everything together, adding water slowly by individual tablespoons until a non-sticky dough is obtained
  3. Dough needs to be kneaded repeatedly until smooth and uniform in color. 
  4. Cover dough with cloth and set aside to rest for 30 to 40 mins to relax the gluten. 
  5. After resting the dough long enough, go back to the dough by first dividing the dough into 4 portions. 
  6. Using pasta machine, process individual dough portions by repeatedly laminating and thinning the dough into elongated flat sheets before cutting into taligatelle-like strands. Dust some flour on the noodles to prevent noodles from sticking together. If pasta machine is not available, simply roll dough with rolling pin, on a flat surface dusted with flour, into elongated sheets before folded the dusted sheets slightly and cutting into strips. 
  7. If you are making mee-hoon-kuay, simply hand stretch the flat sheets dough into desired free-style shapes accordingly.

Method (for the meat sauce)
  1. In a saucepan, heat up 2 tbsp cooking oil. Add chopped garlic and shallots, stir-fry until shallots turned translucent and aromatic. 
  2. Add minced pork followed by all seasoning and stir-fry until meat is cooked and uniform in color. 
  3. Add in mushrooms strips, black wood ear fungus strips, and some mushroom soaking water. Stir well and cover with lid. Leave to simmer over medium low heat for 10mins. 
  4. Add some corn starch mixed with some mushrooms soaking water to thicken the sauce. 
  5. Dish up, covered, and set aside. 

Everything is prepared for the meat sauce.


Meat sauce is well cooked and in uniform color.

Method (to cook pan mee)
  1. Prepare two heavy saucepan. One side is 2 ladle cups of boiled water, another side is 2 ladle cups of soup base. Bring both to a boil
  2. Add a serving of noodles into the boiling water saucepan, cook noodles for a minute. Transfer half-cooked noodles into the soup base saucepan, and add a serving of vegetables. Adjust your cooking time accordingly.
  3. When noodles are cooked, crack an egg into the middle of the pot and leave it with lid on briefly for about 20 secs for the white to cook slightly.
  4. Ladle everything into a serving bowl, try not to break the yolk. Garnish generously with one portion of meat sauce, fried crispy anchovies, fried crispy shallots and serve!
You can, of course skip the part of using boiling water saucepan. You can just throw in your noodels and just cook it in the soup straightaway. However, the noodles will make your soup broth looked cloudy and thickened a little. I personally prefers to half-cook the noodles in boiling water first, as this step allows me to have nicer and clearer broth.

Pan Mee... Long, flat striped noodles.


While mee-hoon-kuay is free-style shaped flat dough by simply hand stretch the flat sheets dough in organic forms. There's no rocket science. Everyone can do this. To me. it should look homely and comforting. There's no rules here.


Look at my Pan Mee soup. The soup is quite clear and less cloudy compared to those selling outside. Although there's extra effort in cooking process, but this will make your noodles taste better in overall.


In Kuala Lumpur, Klang Valley, there's a popular version of Pan Mee that is prepared dry version. Everything is the same, just that they are without the soup, fiery dry chillies flakes are added, topped with some spring onions and stirred into noodles. That's another great way of enjoying Pan Mee.

Maybe next time I will try making dried version of Pan Mee.


I love this soup noodles. I think everyone should make this at home at least once. This just involves a few ingredients, and I guarantee you that this is a great bowl of comfort food, and something easy to prepare for weekend lunch for family.

So.... do you prefer pan mee? or mee-hoon-kuay?

TeowChew Png Kueh / TeowChew Glutinous Rice Dumpling (潮州饭粿 / 潮州红桃粄 )

$
0
0
Beautiful pink hue rice flour skin wrapped with flavorful glutinous rice. Pressed on a nicely designed peach shaped wooden mould, and then steam the dumpling to perfection. You can eat it freshly steamed, or pan-fried. It's up to you.


I have a long list of kuehs' and dumplings to make. But first, I wanna make TeowChew Png Kueh.

Max told me that he doesn't really fancy Png Kueh. He felt that it is a super thick skinned tasteless kueh. I frowned when I heard how he described it. But I just braved myself to do it, even though I knew he probably won't appreciate it.

In Tradition, almost every TeowChew family will make Png Kueh for festive season and also part of the religious offering. There are white and pink version of peach dumpling. White is commonly used as offering to the ancestors, pink is used during religious praying session. In Malaysia, there's still certain TeowChew family practicing the Png Kueh's color differentiation for different purpose. But in Singapore, white colored Png Kueh almost doesn't exist anymore unless they are making it on their own at home.

This lovely pink peach shaped dumpling has two versions, differentiating different clans.

The TeowChew version's pink peach shaped dumpling is wrapped with flavorful glutinous rice filling, called 潮州饭粿 / 潮州红桃粄. The HorPor Clan (河婆) version's pink peach shaped dumpling is wrapped with crushed toasted peanuts with sugar, and this sweet dumpling is identified it as 桃粄.

Max like it pan-fried. The crusty layer of skin gives aroma, served with sweet dark soy sauce, some toasted sesame, I personally preferred to add some chopped coriander and chillies for richer in flavor. Yummm!!!


It's quite a challenge for the first time, without anyone guiding me. I need to factor in the overall taste of the Png Kueh as a whole. The skin is almost tasteless. The glutinous rice filling is savory. Both skin and filling will be eaten and chewed together in my mouth. And so, the filling must be more salty than the savory glutinous rice that we usually cook for plain eating. And this is how we balance the overall taste.

I also imagined that the Png Kueh to be pan-fried, serve with sweet black soy sauce and chilli. Sweet black soy sauce has slight saltiness, and so does chilli sauce. Hence, the saltiness of the Png Kueh itself cannot be over-powered, but at the same time, it must be flavorful, robust and aromatic. In Singapore, yes, we eat it this way. But in other places, maybe they eat it plain. If you love it in plainly steamed Png Kueh rather than pan-frying, I'd suggest you to add another half tsp of salt on your glutinous rice seasoning.

This Png Kueh is lightly pan-fried. The skin is not as thick as those selling out there. The filling is firmly pressed during wrapping, and hence, filling is fully packed, to ensure every chew gives mouthful of flavored glutinous rice. Max is totally sold by my Png Kueh. He says he'd changed the way he feels about Png Kueh. Hahaha...

You want a bite?


For Png Kueh, you need to plan ahead. Glutinous rice and chinese dried mushrooms need to be soaked overnight. So, here, I will tell you my preparation process to shorten your actual day's chore.

DO NOT get freaked out by my long writings. I'm just trying to give you as much details as you probably need. This recipe makes 20 to 22 dumplings. But it also depends on the size of your dumplings, and how thick or how thin your dumpling skin is. My dumpling skin is 45 grams each dough, and wrapped up 40 grams of glutinous rice filling.

Ingredients 
(Source : Authentic Chinese Dumplings published by Famous Cuisine Publishers, with modification) 

The Skin Dough
  • 400g Rice Flour
  • 80g Tapioca Flour
  • 1 tbsp Caster Sugar
  • 560ml Boiling Water
  • ½ tsp Salt
  • 2 tbsp Cooking Oil
The Glutinous Rice Filling
  • 360g Glutinous Rice, soaked overnight
  • 60g Chinese dried mushrooms, soaked overnight
  • 25g Dried Shrimps
  • 12 Shallots
  • 1 can of Canned Braised Peanuts
Seasoning
  • 1 heaped tbsp Premium Oyster Sauce
  • ½ tsp Sesame Oil
  • 3 tbsp Light Soy Sauce
  • 1½ tsp Sugar
  • ½ tsp Salt
  • 1½ tsp White Pepper
  • 6 tbsp Water
Serving Suggestions
  • Sweet Dark Soy Sauce
  • some toasted sesame seeds
  • some chopped coriander
  • some chilli sauce or sambal or whatever chilli you prefer
Note : The original recipe ask for 600g Rice Flour and 100g Tapioca Flour. But at the end of the day, I have 20% dough leftover, and no more filling left. So, I discarded the remaining dough. And so, if you are like me, prefer thinner skin and thicker filling, this recipe above gives you the right amount of dough with the right amount of filling. But if you prefer thicker skin just like those store-bought dumpling, do add 20% of everything for your dough recipe.

Preparation (The night before) 
  1. Walk to the supermarket and get everything I need. 
  2. Wash and soak glutinous rice. Do the same to the chinese dried mushrooms. 
  3. Peel shallots, rinse, pat dry with kitchen towel, pack it in a plastic bag. Throw it in the fridge. 
Preparation(Actual Day) 
  1. Rinse and soak dried shrimps for 10mins. Chop up dried shrimps using chopper.
  2. Snip away mushrooms stems, discard. Cut mushrooms into small pieces. 
  3. Chop up peeled shallots using chopper. 
  4. Open up a can of braised peanuts. Discard the braised sauce. We only need the peanuts. 
  5. In a bowl, mix all the seasoning together. 
  6. Drain soaked glutinous rice, place it on a large plate, steam it for 25 minutes. Uncover the lid and splash some water on the glutinous rice every 10 mins steaming interim. Set aside.

To cook the Filling
  1. In a pre-heated wok, 4 tbsp cooking oil, saute shallots and dried shrimps over low heat until fragrant. 
  2. Add in mushrooms, stir fry briskly over until well combined and heat through. 
  3. Add the steamed glutinous rice, turn to low heat. With your spatula, break the lumpy glutinous rice.
  4. Pour in seasoning, stir and toss well. Ensure all glutinous rice is well coated with the seasoning. Stir in braised peanuts. Stir well.
  5. Dish out. Transfer the glutinous rice to the steamer and steam another 10mins.
  6. Remove from steamer and leave to cool. Cover it up with a wet towel to prevent the top layer of the glutinous rice from drying out.     
Steaming, stir-frying, and steaming... This process is to ensure glutinous rice is evenly flavored, evenly cooked, bouncy, chewy, and yet not overly cooked. I don't like mushy glutinous rice. It is easy to over cooked it. But it is not easy to cook it just right. Some people choose to let the rice cooker to do the job. I'm anal quite particular. So, do it the way my mother taught me, and it never fails me so far, although there are more steps to follow.

You can get braised peanuts from supermarket. I used Narcissus brand. I think it taste pretty good.


To prepare the Dough
  1. In a mixer, add in rice flour, tapioca flour, sugar and salt. Mix well. 
  2. While the mixer is still moving, add in boiling water and cooking oil in the flour mixture in two intervals. Half boiling water, mix, half cooking oil, mix. And then, half boiling water, mix, half cooking oil, mix. And when I said boiling water, use boiling water. Don't give me warm water and expect it to work. You need boiled water to "pre-cook" the dough here. 
  3. Add a drop of red coloring, mix. Observe the change in color for your dough while mixer is doing the job. Is that the pink hue you want? If yes, continue to let the mixer to mix. If no, add more coloring. Do remember to add coloring abit at a time. You don't want to over-power the color. 
  4. Continue to let the mixer mix until the dough turned entirely pink. 
  5. Transfer the pink dough into a big bowl, and this is where you need to do it manually. Knead the dough with both palm until dough is smooth. 
  6. Evenly divide the dough into small portions, cover it with wet cloth to prevent dough from drying. My individual dough is about 45g each.

To wrap and form the dumpling
  1. Form the dough into ball shape, then, make a hole, flatten it with your fingers, to create a "bowl" shape. 
  2. Spoon in some glutinous rice filling, wrap well. My filling is about 40g for each dumpling. Firmly press the rice filling abit, so that they are packed together and you will be able to do the wrapping easier. If there's holes here and there, patch it with some extra dough pieces. It's fine. Patches would be hardly seen because it is steamed dumplings. Do it the way you prefer.
  3. Dust the mould with a little tapioca flour, knock the excess tapioca flour out of the mould. Dust the wrapped dumpling with a little tapioca flour too if you want. Dusting the mould is tedious. I only dust the wrapped dumpling. It works also. 
  4. Put the wrapped dumpling into the mould, press it firmly with your palm and invert the dumpling. 

To steam and serve
  1. Arrange dumplings on a greased steaming tray or a plate.
  2. Steam the dumpling under medium heat for 10mins or until it is cooked. If your dumpling is bigger in size, steam it for another 1 or 2 minutes. 
  3. Transfer steamed dumpling into a plate and leave it cool abit, then, grease the dumpling with some cooking oil on top to prevent them from sticking to each other. 
  4. Serve the dumpling hot from the steamer or slowly pan-fry it to achieve crust on the skin, accompanied with sweet dark soy sauce, toasted sesame seeds, and some chilli sauce if you prefer.  

The recipe request it to be steamed under high heat. And yes, usually, some people do that. But I realized that steaming the dumpling over high heat will probably over-steamed it and eventually, the dumpling will somehow disfigured. The beautiful flowery pattern on the dumpling will "melt-away". I believe you've seen disfigured store-bought ang ku kueh before don't ya?

This is my peach shaped wooden mould. I got it from taobao, the china shopping website. I love it and it is probably one of the nicest peach shaped mould I've found so far.


Look at the result. Isn't it lovely? It has nice round sexy butt! Max says ... "我的饭粿有屁股的!!!" Hahaha..


The medium heat steaming gives good result in retaining the nice flowery pattern on the dumpling. Absolutely lovely! However, the skin will turn abit hardened when dumpling is cooled. Just re-steam it before serving, and the skin will turn soft again.


For this first attempt, the result was satisfactory, although I do prefer the skin to be slightly softer. But again, it depends on what's your expectations on the end result. I'm quite happy with it for now. But I will continue to seek improvement. When it comes to cooking, imaginations do comes in.


TeowChew, Hor Por, Hakka, GuangDong and HuiZhou. They are so near to each other. That probably explains why there's a similarity in their traditions and cuisines. Not only the peach shaped dumpling. For example, Hor Por style Mochi 河婆客糍粑 and Hui Zhou style Mochi. They are the same. But in different shape. In Singapore, we identified it as "Muah Chee"麻糍, in Japan, it is Mochi.

There are so many types of kuehs, dumplings and small eats to learn and explore. I'm quite into it. Are you one of them?

Mushrooms Lor Bak Png / Taiwanese Braised Pork Rice Bowl (香菇滷肉飯 / 台湾滷肉飯)

$
0
0
Braised pork rice bowl, generally known as Lor Bak Png (aka Lu Rou Fan滷肉飯) is always one of the well known rice dish in Taiwan. Ask around Taiwanese, all of them can tell you their love for Lor Bak Png. For the first time I went Taiwan, I had Lor Bak Png, I'm absolutely in love with it.

I'm actually salivating when I'm writing this post. Darn!!!


There's a difference between Lor Bak Png in the Northern Taiwan and the Southern Taiwan. Northern version uses five spice powder, cinnamon powder and fried shallots for extra pungent. While Southern Taiwan prefers original taste. No spices are added usually. They only depends on fried shallots and the taste of the fresh meat. Southern Taiwanese loves sweet, and this also explains Southern version of Lor Bak Png will use more sugar than the Northern Taiwan version.

The one I'm cooking here, is Northern Taiwan version with the addition of mushrooms. Recipe adapted from a Taiwanese Braise Pork Recipe Book written in Chinese.


There's some rules you need to know before you cook this dish.
  1. If you think this dish will make you put on weight, skip it.
  2. If you think this is unhealthy, skip it.
  3. If you want to substitute this recipe with minced meat, this is not the right recipe for you.
Life is short. Just keep calm, cook it and eat it!

Please do not use minced meat for this recipe. To have better chewy texture, we need to use pork belly cut into small cubes. The amount of fattiness in the meat must be adequate. Fatty vs Meat should be 2 : 3 ratio. You must have sufficient fat meat to provide sufficient fats to the entire dish. If you look at my photos, you will know what I'm trying to tell you.

Good braised meat can only be achieved if the soya sauce used is good. I don't know what can you get at your area, but please buy Taiwanese premium soya sauce as first choice. If not, buy premium first draw soya sauce (like me).

I choose to cook this version of Lor Bak Png with mushrooms is because I could imagine how delicious it would be by just reading the recipe book. I couldn't wait to cook, and I couldn't wait to tell you how delicious it is. This recipe serves about 8 or upto 10 servings of rice bowl. If you have a small family like me, you can cook full recipe, eat half, and keep the other half for next day or even the day after.

Ingredients
  • 100g Dried Chinese Mushrooms (香菇)
  • 500g Pork Belly, skin on (三层肉)  ... See Note*
  • 80 ~ 100g Pig Skin (新鲜猪皮)  ... See Note*
  • 50g Pork Fats (新鲜肥猪肉) ... See Note*
  • 100g Shallots (小葱头) or 40g Fried Shallots (炸葱酥) ... See Note*
  • 80g Red Onions (红葱头)
  • 2 cloves Garlic, minced (蒜头), optional
  • 650ml Water (水)
Seasoning
  • 150ml First Draw Soy Sauce (头抽) (I used Lee Kum Kee)... See Note*
  • 1 tsp White Pepper Powder (白胡椒粉)
  • 1/2 tsp Sea Salt (海盐)
  • 1 tsp Five Spice Powder (五香粉)
  • 20g Rock Sugar (冰糖)  ... See Note*
  • 1 pc Star Anise (八角)
Garnishing
  • Coriander
  • Pickled Daikon
  • Boiled eggs, optional
Note :
  1. Some over-friendly butcher will cut away the skin for you when you buy Pork belly. Please make sure you buy the pork belly with skin on it. 
  2. Ask butcher for fresh pig skin. Usually they will give it to you for free. Extra pig skin gives extra collagenous chew to the entire dish. But if you cannot get it, you can choose not to add pig skin into this dish. 
  3. Pork fats is important. DO NOT skip this. 
  4. 100g Shallot, peeled, sliced, fry, and it will give you estimation of 40g Fried shallot. That's what it means. You just got the estimation.
  5. I don't have Taiwanese soy sauce with me. So, I just make do with Lee Kum Kee first draw soy sauce. You can use your preferred brand first draw soy sauce, First draw soy sauce is tastier and soy sauce taste is heavier. 
  6. Do not replace rock sugar with sugar. You need rock sugar for this dish. Rock sugar and sugar taste different. 
The Lee Kum Kee First Draw Soy Sauce that I used for this dish.

Preparation 
  1. Soak dried mushrooms till soft or overnight. Squeeze away excess water, dice mushrooms.
  2. Cut pork belly into small pieces.
  3. Wash pig skin, use knife to scrape away the excess fats on the pig skin. Cut pig skin into small pieces. 
  4. Cut pork fats into small piece. In a saucepot, throw in the pork fats pieces, under slow and low fire, let the pork fats render on it's own. Give it a stir occasionally to prevent it from sticking together. When the pork fats bits turned pale golden, it is done. Remove pork fats bits for later use and set aside the pork oil or we called it Lard. You only need estimated 3 tbsp pork oil for this dish. The rest of the oil, keep them well in the fridge. You can use it next time for any stir fry dish. Especially stir-fried noodles. WoohH!!!
  5. Shallots preparation mentioned as per above NOTE. peeled, sliced, fry.  
  6. Red onions, just finely chopped them and set aside.  
Cooking Method
  1. In a wok, heat up 3 tbsp Pork Oil / lard, add in chopped red onions and garlic. Fry till fragrant, 
  2. Add in mushrooms, fry until you can smell the mushrooms aroma. Add more oil if needed. 
  3. Add in pork belly, fry until the meat turned white (almost 80% cooked). 
  4. Add in soy sauce, fry until the soy sauce is slightly caramelized.
  5. Add in the rest of the seasoning. Fry until the dish gives good aroma. Add in water. 
  6. Once water is boiled, reduce to slow and low fire, covered. Let it slowly cook for 30mins.
  7. After 30mins, add in fried shallots and about 2 tbsp amount of crunchy pork fat bits that you reserved earlier, give it a stir. Add a little more water if necessary. Let it simmer another 15 to 20mins. Set aside for serving later. 

To Serve : Pour a scoop of braised pork over a bowl of piping hot steamed rice. Garnish with coriander and pickled daikon if you prefer. Braised hard boiled eggs on the photo is optional of course :)

Braised pork dish is very forgiving. You can braise a pot. Keep them well. Reheat it again when you feels like eating. Infact, if you can leave this pot of goodness overnight, it would taste even better on the next day. When you intend to cook this braised pork at home, be warned that you need to cook extra rice.


This braised dish will give you very little and thick sauce. To achieve the desired effect, you will need to understand this part. Although slow braising could reduce the water level, but what thickened the sauce is the natural collagen that comes from the pig's skin. This also explains why extra pig's skin is added to be braised together. The translucent pieces of pig's skin is braised to perfection is an absolute delight to savor.


Oh yes. For those who wants to know how I prepare the eggs. But this is NOT how Taiwanese Lor Bak Png eggs supposed to look like. Taiwanese Lor Bak Png eggs is hard boiled eggs. I prepared this eggs to eat with the braised pork rice bowl is because Max wants it.
  1. Add a tsp of vinegar in boiling water. Cook eggs for 5mins. 
  2. Remove eggs from boiling water after 5mins and put eggs into the ice-cold water and let eggs cool down into ice-cold temperature before removing the shells. 
  3. Soak eggs into soya sauce mixture (1 part soya sauce, 1 part mirin, 1 part water) for a day. 

This dish is simple but yummy. It gives wonderful flavors and aroma. I know it's sinful, but I you don't have to eat it everyday right? It's a rare occasion indulgence. Haha.. Just take everything in moderate.

I would highly recommend you to try replicating it. I love it! I love the pig skin! And I'm sure most who had tried it would agree too!

Hakka Steamed Salted Chicken / 客家蒸盐鸡

$
0
0
Everyone is waiting for this recipe. It looked easy by looking at the photo. I mean... c'mon! It's just salted steamed chicken! But let me tell you, to make this right, you need abit of patience here.

This is my grandma's dish. My mom continues the dish. Recipe I'm sharing here is the same as the one my grandma taught. But I improve the cooking method to achieve better tenderness of the chicken after me and my mother talked about it. As shared by my grandma, there are two types of Hakka Salted Chicken. One was the Hakka Baked Salted Chicken. Another one, is Hakka Steamed Salted Chicken. Correct me if I'm wrong, but that's I was told.

This.... I cooked this 2 years ago. Using eunuch chicken (太监鸡)  that I got from Malaysia. Thanks to my mom for arranging that. The meat is muscular and flavorful, and the color of the skin is *fwohhh* I can eat this everyday!


And this, I used Kampong Chicken (甘榜鸡) that I got from Sheng Siong Supermarket, as that is the best chicken I can get at that point of time, and I brought this salted chicken dish to Edith's place for gathering. They love it!


And this, I used Malaysia imported bald neck kampung chicken (光径甘榜鸡), bought from one of the farm market in Choa Chu Kang Farm Mart. Very nice texture. Worth my trip to Choa Chu Kang for sure.


My mom's steamed salted chicken always tastes the most comforting. With the simplicity of this dish, the quality of chicken used is really important. Free-range or Kampung Chicken is a must. I make this dish for many times, and I never get sick of it. They may looked ordinary, but I guarantee you that this is really yummy to eat. To make this dish, you need a good bird as a whole. As you can see, there's a difference in results when you use different types of chicken. I would not want you to buy the ordinary fresh white fat chicken for this dish. When the dish is simple, you need to ensure that the ingredients used are the best.

Be fearless my friend. Just buy the whole chicken and give this a shot!

Ingredients
  • 1 whole bird of good Kampong Chicken, weight about 1.5kg
  • 60 grams of Sea Salt (or 50g table salt)
  • 2 stalks of Spring Onions
  • 3 to 4 thick slices of Ginger
  • Enough water to cover the chicken, Probably 2.3L to 2.5L, depends on the size of your pot.
Method
  1. Wash and trim away visible fats from the chicken. Chop away the chicken feet. Stuff ginger and spring onions into the cavity of the chicken.
  2. Find a slim and tall pot that can fit in a chicken nicely. Bring water to a boil. Once water is boiled, hold the chicken head (refer to photo), soak the chicken body into the boiling water. With your hand still holding the chicken head, lift the chicken up, and soak it into the boiling water again. Do this for 4 times before you release the chicken head and let the chicken submerge into the water completely. By doing this, water will go into the chicken cavity, and hence, the whole chicken will be well cooked. Water level must completely cover the chicken.
  3. Immediately turn the fire into dead low and slow, lids on, and leave it there for 5mins. Remember to set timer. Do not go over 5 mins. 
  4. After 5 mins, heat off. Leave it there untouched. Set timer for 1 hour. Walk out of the kitchen and go watch your TV show. If your chicken is 1.7kg or anything bigger than 1.6kg, please make it another 10mins or so. You have to gauge the time yourself. For 1.6kg chicken, yes... 1 hour is just nice.
  5. Use a pair of chopsticks, carefully and gently remove the chicken from the pot and place the chicken to the big tub, and fill with running tap water to cool down the chicken. Try your best not to bruise or tear the chicken skin. 
  6. When the chicken is cooled down abit on the surface, put the chicken into a tub of ice-cold water to further cooling process until chicken is completely turned cold. Drain. 
  7. Chop away chicken neck. And then chop chicken into half (refer to photo). And then, apply both halved chicken piece with generous amount of sea-salt evenly on the chicken until all sea salt is used up. Salt the chicken neck too. They can be eaten. But I don't encourage you to eat the skin for the chicken neck tho. Do not get freaked out by the amount of salt I use. Be adventurous. Just do it.  
  8. Leave the chicken sit on the tub or a plate. Let the chicken sit there uncovered to air-dry while it gets marinated for at least 12 hours. 

Things to note....

I usually leave the chicken sit on my table top for upto 4 to 5 hours. And then, I cling-wrap it and keep it in the fridge until tomorrow. When tomorrow comes, I just take the chicken out of the fridge, chop it into pieces, arrange it on a plate. If you are eating the chicken neck, remember to remove the chicken neck skin before chopping them.

My grandmother will steam the chopped chicken for quite a number of minutes before she serve the chicken to us. But the chicken will shrink and over-cooked and not so nice looking in presentation. Chicken juices will also released from the chicken too. So, I've modified this method. Instead of steaming it over brave fire, I steam the chicken without fire. It means, I bring the steamer into a boil. Off the fire, put the chicken into the steamer, covered, and let the remaining heat from the steamed water to warm the chicken for 3 to 5 minutes. Remove the chicken dish and serve with some spring onions as garnishing. The chicken is just warm, and nice to eat. Infact, this dish can be served under room temperature. When I'm feeling lazy, sometimes, I will skip the steaming process, since the chicken is already cooked. Chicken piece will remain juicy and tender. 


1.6kg chicken vs 60 grams of sea salt sounds like a horribly salty drama. But I assure you, this is just right. You need to have enough salt to marinade the chicken for at least 12 hours. During marinating process, some salt will drop and end up on the plate. In short, you are not eating 60 grams of salt for sure. It will kinda diminish over the marinating time. Marinating upto 12 hours is to ensure you produce deeply flavored salted chicken. But if you are making it on the same day, please prepare it early in the morning and you can have it for dinner too. Bear in mind, sea salt taste better and less salty. Ordinary table salt is saltier and I don't like it.

Please take note - Do adjust the salt usage and the cooking time according to the size of your chicken.

This recipe is simple and homely. It doesn't require complicated ingredients. I urge you to try it at least once. You will then know why I kept repeating this dish at home. It's convenient as it allows me to prepare this dish ahead. Sometimes, I cook the whole chicken on day 1, eat half of the chicken on day 2, and freeze the other half of the chicken for another day. It's convenient.

For my friends who adore my Spring Onions and Ginger Oil as an optional accompaniment to this dish. Thanks for loving it. My grandma's recipe do not have this optional accompaniment to go along with this steamed salted chicken. Because I love it, that's why I prepare it to go along with the chicken. It's absolutely optional. And now, here's the recipe.

Spring Onions and Ginger Oil
  • 100g Old Ginger
  • 25g Spring Onions (or more), chopped
  • 2 tbsp Cooking Oil
  • 1 tbsp Sesame Oil
  • ½ tsp Salt, or more to taste
  • ½ tsp Sugar, or more to taste
Blitz ginger into paste in a food processor. Heat up 2 tbsp oil and 1 tbsp sesame oil on a frying pan.

When the oil is hot enough, add in ginger paste. Fry well for 2 to 3 mins.

Add in spring onions, sugar and salt. Give it a quick stir. Heat off, set aside to infuse. Easy!


On a side note, I know and I foresee, after I posted this recipe, there will be alot of readers will ask me about the cooking time. Ask me if the chicken will be cooked completely, since I'm just letting the chicken sit in the boiled water for 1 hour only. If you followed my recipe before, you will know that I do not share something that doesn't work on me. If you follow exactly what I said, the chicken will gives you well cooked, juicy and tender meat result. But if you are new, not adventurous, and still cannot trust me completely about the cooking time, then, I would suggest you to slightly overcook the chicken. There's nothing right or wrong. It's just your own preference.

Happy Cooking!

Pad Thai (ผัดไทย) / Thai Stir-Fried Rice Noodle - (AFF - Thailand)

$
0
0
Time flies really fast. It's November already and it's Thailand month for Asian Food Fest.

This stir-fried rice noodle dish is commonly found along the street or at casual local eateries everywhere in Thailand. Pad Thai is also one of the Thailand's national dishes and has become popular in many countries. Just walk into any of the Thai restaurant or eateries, they definitely have Pad Thai in the menu.


Other than the usual Tom Yum Goong (Thai sour and spicy soup), Pad Thai is one of my favorite food. 5 years ago, I went Bangkok, and I didn't get to eat any good Pad Thai. 3 months ago, Max brought me, my MIL and friends to Phuket for vacation. And he brought us to one Thai fine dining restaurant beside JW Marriott for some authentic thai food. I ordered Pad Thai, and I'd say, that's the best Pad Thai ever! I still remember how it taste, but I didn't take photo of it.


Pad Thai is indeed a significant street food that I personally adore so much. Traditionally, prawns are used in Pad Thai. However, chicken or pork Pad Thai is also found commonly nowadays. If I were to describe the taste of this dish, the tang from the tamarind pulp, the special saltiness from fish sauce (Nam pla น้ำปลา), the sweetness from the palm sugar and the hot from the red chilli pepper. Fwoooh!!! I love it!!!

It may looked simple, but I have to confess that, to make a good serving of Pad Thai do need abit of patience here.


The list of ingredients here is quite long. If you are looking more into traditional Pad Thai recipe, this is it. However, in such modern days, people do tends to modify or forgo some of the ingredients when they cook it at home. Hence, it's eventually up to you to decide what kind of Pad Thai you want to serve.

Ingredients (Serves 3 to 4)
(Source : She Simmers, with modification)

  • 200g Thai Dried Rice Noodles
  • 4 tbsp Ground Nut Oil or Cooking Oil
  • 100ml Pad Thai Sauce *See below for recipe, also see Note
  • 2 cloves Garlic (8g), peeled and finely chopped
  • 1 medium Shallot (20g), peeled and finely chopped
  • 24g Chopped Preserved Radishes (a.k.a 菜圃)
  • 8g Shell-On Dried Krill
  • 100g Firmest Tofu you can find *See Note
  • 220g Large prawns, peeled and deveined
  • 2 Large Eggs
  • 110g Bean Sprout
  • 5 stalks of Chinese Chives (韭菜), about 50g

For Pad Thai Sauce
  • 36g Fish Sauce
  • 45g Palm Sugar (I used Gula Melaka)
  • 12g Brown Sugar
  • 30g Tamarind Paste rub in 40g Water, discard the seed
For Garnishing
  • Sugar
  • Dried red pepper flakes
  • Fresh Lime wedges
  • Chopped roasted peanuts
  • Extra tofu
  • Extra bean sprouts, soaked in water to keep them fresh and crunchy
  • Chinese chive stalks
  • Red Chilli (Optional)
  • Coriander (Optional)
Preparation 
  1. Soak Dried Rice Noodles with water for 1 hour or until it is completely soften, drained.
  2. In a small saucepan, put all Pad Thai sauce ingredients in and cook over medium heat. Stir constantly until the sugars have dissolved. Once the sauce is boiled, remove sauce from heat and let it cool down for later use.
  3. Cut the chive blades into 1-inch pieces, reserve the bottom parts of the stalks to eat with the finished dish. And also, prepare all the necessary ingredients and ensure everything is in place before you start cooking, included the garnishing.
Note : 
  1. Just one thing that you have to take note. Get the firmest tofu that you can get. Thai style firm tofu (used for Pad Thai) is yellow on the surface. I asked one of the Thai lady who run a Thai eatery in Golden Mile, as I want to know where to get it. She smiled and say "It is just tofu. If you cannot get it, you can just rub some turmeric powder on it and make it yellow. Color doesn't matter. It just looks nicer only". I'm glad to have her assurance. So, I go ahead to get a block of ordinary firm tofu and rub it with turmeric powder. However, I think this is absolutely optional :)
  2. The Pad Thai sauce can be made in advance. It freezes well. You can also cook the sauce in bigger batch, freeze the sauce in an ice cube tray, then pop out the frozen cubes and keep them in a freezer bag. Thaw out only what you need at a time. 
Method
  1. In a flat non-stick pan, set over medium-high heat. When the pan is hot enough, add 2 tablespoons of ground nut oil.
  2. Once the oil is hot, immediately add the noodles in, followed by the sauce. Stir constantly. I used a spatula and a pair of chopsticks to keep the noodles moving all the time.
  3. about 40 seconds, you should be able to feel that the noodles have softened up considerably. Pls go ahead and taste the noodles to see if it is soft enough to your liking. If it doesn't, continue to cook further. Do splash some water to the noodles to soften it further if needed. Reduce the heat if needed too.
  4. Push the noodles to one side of the pan and add the remaining ground nut oil to the empty side of the pan.
  5. Add in garlic, shallot, preserved radishes, dried krill, tofu and fresh prawns.
  6. This is the critical point of process - Do whatever you can to keep the noodles moving almost constantly to keep them from burning or forming excessive crust at the bottom, at the same time, get the shrimp to cook about half way through, AND keep the small bits of the stuff in the pan from burning.
  7. Once the fresh prawns is turning abit opague on both sides and all the small bits are getting brown, make a well in the middle into which you add the eggs.
  8. Break and scramble the eggs with the tip of your spatulas; let them cook undisturbed on one side before flipping and breaking them into smaller pieces, keeping an eye on the other members of the pan the whole time, especially the noodles.
  9. By the time the eggs are cooked, the prawns should be fully, but not overly cooked. The noodles are soft and chewy and the sauce has been entirely absorbed into the noodles. You will also noticed that the little bits has crisped up and kinda caramelized. Heat off immediately.
  10. Add in the 1-inch Chinese chives and bean sprouts to the pan and give it a quick but gentle stir. The intention is to wilt the bean sprout and chives while getting all the bits thoroughly interspersed into the noodles. Serve the Pad Thai immediately, or you can let it cool for 8 to 10 minutes in the pan. I did rest my Pad Thai for awhile, and I think it is at its best when the noodles gets to rest awhile :) 
  11. To serve - Refer to my photo and you will know what are the condiments and garnishing to go along with Pad Thai. Do season with extra fish sauce if you wish. I'd highly recommend you to add dried red pepper flakes for extra kick. I love it!
This is exactly how it looked like (I mean the amount of condiments and garnishes to go along with) when I had my Pad Thai at Ginja Restaurant Phuket :)


On a note, I source all my ingredients at two location. One is at Golden Mile Complex, Beach Road. And another one is at Sheng Siong, Chin Swee Road.

The Thai Dried Rice Noodles : I got it from Golden Mile Complex. They have a Thai super-mart there. They sell everything about Thailand and Vietnam stuffs. Do remember that this Thai dried rice noodles has different thickness. You may choose the thinner ones for shorter cooking time (I assume). However, I'd chosen the thicker version because this is the exact thickness of rice noodles that I had when I'm in Phuket :)


The dried krill : I have it at home. I got mine during my trip to Tokyo last year. It looked very much the same as the one I saw in Thailand last time. So, I decided to go ahead to use it without buying. However, I strongly believe that Golden Mile Complex Thai super-mart do carry this. Do ask around.

The rest of the ingredients : I just make a trip to Sheng Siong and I've got everything I want. No stress at all.


These are all the condiment and garnishing needed for Pad Thai. So, do prepare way ahead. Once your Pad Thai is cooked, you can use it immediately.


If you never try Thai food before, this might be a good dish to start with to introduce yourself to Thai food. It has a good combination of classic flavors and it is mild and not so spicy.


This Pad Thai recipe is quite delicious and the recipe is not difficult to follow. The key is to read every single steps, draft out the shopping list to ensure you didn't miss out anything when you shop for ingredients. Get everything ready before you start cooking. If you follow this, you won't go wrong.

So, don't feel stressed. Keep calm and get cooking! :)


Like Pad Thai? You don't have to go to Thailand. Cook it at home over the weekend!

Today marked a very significant day in my life. After I struggled and neglected my blog for a year, I finally completed my program and I can now spend more time cooking, baking and for myself. Oh..Happy Day!!!! :)


I am submitting this post to Asian Food Fest ( Thailand ) – November Month hosted by Lena of frozen wings

Laksa Lemak / Nyonya Laksa

$
0
0
Seafood-rich and creamy coconut milk curry-like gravy with a lingering spice kick, enjoy together with noodles and the rest of the fresh ingredients. Ahh... That's the bowl of warm, gently spicy comfort noodles I want now. If you are celebrating Singapore SG50, cook this! Make Laksa Party!

Salivating!


For those who stayed in Singapore or visited Singapore before, I'm sure you love Singapore Laksa, or Laksa Lemak, or also known as Nyonya Laksa, which is a popular Peranakan dish. The Peranakans are ethnic Chinese who settled in the British Straits Settlement back in the olden days.


However, as most recipes go, several variations of Laksa's were tweaked to their individual liking and can be found in different parts of hawker centres and food courts in Singapore. Although there's arguments says that Katong Laksa serves the best and iconic Singapore Laksa. They are good, but I personally feels that it could be better. I shall leave it to you to do the judgement. I shall focus more on this recipe.

This is Alan's recipe, produces thick and flavorful gravy, not as watery as what you expect at the store-bought kind. This recipe is absolutely good to host a Laksa Party at home. It feeds about 6 to 8 adults. This dish includes plenty of Southeast Asian combinations. Dried shrimps, fish cakes, cockles, coconut milk, daun kesom, chillies, lots of spices and everything nice.

Before everything else, as I was told, Rempah (also known as spices) is the soul of a good bowl of Laksa Lemak. Rempahs can be prepared way in advance, even a week ahead or so. Whenever you want to have so good bowl of soul food, you have your rempah's ready in the freezer!

So, for the first, let's begin with preparing the Rempah.

Ingredients (for Generic Rempah)
  • 70g Red Chillies, remove seeds
  • 10 Dried Chillies, soaked in hot water until soft, remove seeds
  • 5 Candlenut / buah keras
  • 110g Shallots, peeled, sliced
  • 25g Garlic, peeled
  • 20g Ginger, sliced
  • 10g Turmeric Root, sliced
  • 10g Galangal, sliced
  • 4 Stalks Lemon Grass, only slice lower 1/3 whitish portion
  • 5 Bird's eye chillies / cili padi (Optional)
Method(for Generic Rempah)
  1. Chop and blend or pound all spice ingredients together into a fine paste. (See Photo)
  2. Heat up generous amount of cooking oil over medium low heat, gently saute blended spices until fragrant. The spices should darken considerably, starts to glisten as the oil begins to separate from the paste. We identified it as pecah minyak stage for our rempah cooking. 
  3. When generic rempah is cooked, leave it completely cooled, air-tight and store it in the fridge for tomorrow use. Or if you are using it much later, do keep it in the freezer. 
Bird's eye chilli / cili padi is absolutely optional. I prefer to be more fiery. So, I added some of them in the rempah mixture. 
 

Second..... the Prawn Stock. You need some fresh prawns from the market for ideal result.

Ingredients (for Prawn Stock)
  • 1kg Fresh Prawns
  • 1 tbsp Cooking Oil
  • 500ml + 1000ml Water
Method (for Prawn Stock)
  1. To prepare the prawns - 1st, snip off the thorn on the prawn head. 2nd, snip off the eyes. 3rd, remove those dirts inside the prawn heads. 4th, remove the shells and deveinned. 
  2. Keep half amount of the peeled prawns meat well, wrapped, in a fridge for next time use. I'm using it for other dishes. While another half of the peeled prawns, blanch it under 500ml of boiled water until the prawn is just cooked. Keep both cooked prawns and boiled water for later.  
  3. In another stove, a pan heated with a tbsp of cooking oil, add in prawn heads and prawn shells. Pan fry under medium heat until they turned color and the prawns aroma is all over your kitchen. Keep an eye on it, do not burn it. 
  4. Pour 500ml of boiled water that you used to blanch prawns, and additional 1000ml water. Turn it to medium high heat, let it boil. Lower down the heat and let it simmer for 15mins.
  5. Transfer the prawn stock together with the prawn head and shells into the blender. Blits till fine, carefully strained, like making bisque. And prawn stock is ready to use.
Things to take note. Snipping away the prawn eyes and remove dirts inside the prawn head is VERY IMPORTANT. Prawn eyes and dirts are bitter. If you are going to blitz those prawn shells and heads for prawn stocks, you must remove them from the prawns. Otherwise, your whole pot of prawn stock will have bitter aftertaste. My mom used to own a prawn noodles stall when I was very young. This tips is her great advice. I would't wanna take the risk. I will listen to her.


Thirdly... the Laksa Gravy. You can only do this when your generic rempah and prawn stock is ready for use.

Ingredients (for Laksa Gravy)
  • 400g Generic Rempah (as above)
  • 1.5 tbsp Coriander Seeds / ketumbar
  • 100g Dried Shrimps
  • 1 tbsp Toasted Belacan Powder
  • 800ml Fresh Coconut Milk
  • 1500ml Prawn Stock (as above)
  • 6 sprig Daun Kesom / laksa leaves
  • 3 tbsp Sugar, adjust to taste
  • 2 tsp Salt, adjust to taste
  • 2 tbsp Cooking Oil
  • 16 Fish Balls
  • 10pcs Tau Pok, snipped into strips
Method (for Laksa Gravy)
  1. On a small pan, start off with dry-frying the coriander seeds until they are aromatic before milling them into fine powder. The recipe ask for 1 tbsp coriander seed, but I used 1.5 tbsp instead. Sift the milled coriander powder as we only need those fine coriander powder for the gravy. Coarse coriander seeds that doesn't pass through the sieve, and this explains why I use 1.5 tbsp instead, because some will be discarded. 
  2. Dried shrimps needs to be washed and soaked for awhile before grinding them finely into floss using a food processor. 
  3. With a big pan, heat up some oil, add in generic rempah, coriander seeds, dried shrimps, and toasted belacan powder. Fry till fragrant.
  4. Add in prawn stocks and bring to a boil. And followed by coconut milk to create the base. Add more water if needed as you have to build your own preferred gravy consistency. 
  5. Add in daun kesom to the gravy. This gives another level of dimension to the laksa gravy. Add in salt and sugar at this point of time. Give it a taste. Make sure you adjust to the saltiness and sweetness to your individual liking.
  6. Strips of tau pok are then added to soak up all that wonderful richness from the broth. Also, you can add in fish balls at this time to allow it to simmer together. Do this on medium heat for a few minutes and then switch off fire. Do not cover the pot with lid.

Lastly, prepare the rest of the condiments and assembling.

Ingredients (for Condiments and Noodles)
  • 800g to 1kg Rice Vermicelli
  • 500g Cooked Prawns (prepared as above)
  • 300g Bean Sprout
  • 3pcs Large Flat Fish Cakes
  • 4 Hard Boiled Eggs, assuming one portion of laksa only need half eggs
  • 500g Fresh Blood Cockles (weight with shell on)
  • 2 to 4 sprigs Daun Kesom, julienned
Please buy the freshest blood cockles from the market on the same day. Bring home and remove from the shells on your own. Try not to buy those that's sold in bags that shells had been removed for your convenience.


For those who wants some special sambal chilli to go along, as shown on the picture, here's my recipe that I've created on the spot just before the Laksa Party begins.

Special Sambal Chilli(Optional)
  • 70g Generic Rempah
  • 20g Dried Shrimps, washed, soaked, flossed
  • 50g Shallots
  • 3 tsp Sugar
  • some shallot oil
In a pan, put everything together, sautee until fragrant. And now, with everything is ready, the Laksa Party begins....

To Serve
  1. Blanch one portion of rice vermicelli as well as beansprout over a pot of hot boiling water. Drain the water thoroughly before pouring the noodles onto the bowl.
  2. Ladle some hot Laksa gravy onto the noodles. Arrange some fish cakes, hard boiled eggs, blanched cockles on top. Add more laksa gravy over the ingredients if you prefer. 
  3. Garnish with julienned daun kesum, and serve along with some sambal cili immediately. 

The recipe is complicated as it uses alot of ingredients. But I assure you that you will be able to make this a success if you follow my recipe, and let me walk you through the proper preparation of every element. I have to thank Alan for his detailed recipe for sure. He gave me so much insight to this noodle dish.

As an optional idea, you can cut up the noodles, so that the whole dish can be slurped up with a soup spoon, without the need for chopsticks. It's up to individual's preference.


The laksa gravy is thick. I like it that way. This way, the noodles are well binded together with the laksa gravy when eating.

Now that I've tested the recipe, and proven that it works! I would encourage you to do the same, re-invent it to suit your astoundingly acute palate.

You want a bowl right now?


I hope you enjoy it as much as I do. I definitely will recreate this recipe again and again.

Pandan Coconut Butter Cake (班兰椰香牛油蛋糕)

$
0
0
To me, the flavor of Pandan is wholly unique and indescribable. The butter cake is nicely perfumed with the scent of Pandan leaf and coconut, but taste wasn't overpowering. Pandan and Coconut? Yes! They are perfect match!

I received a request on Friday night, asking me to make a cake for one lovely auntie who's celebrating her 84 years old birthday over a Soka Gathering. Idea strikes me, and I drafted this recipe on a paper on a friday night at 11.55pm before I forget. I tweaked the ratio using my all-time-favorite Butter Cake that I've posted back in 2012, and I get started with my baking preparation.


This cake is really overwhelmed with response from fellow beautiful aunties and uncles who tasted my Pandan Coconut Butter Cake this afternoon. Both Facebook readers, friends who had been WhatsApping me for the recipe, yes I know. I've rushed this recipe for you guys now as promised.

This cake is really yummy. I can't help it but wanting to share to everyone. It's so moist, fragrant and flavorful. Me and Max only get share a small piece because fellow aunties and uncles snatched the whole cake within a few minute when the birthday auntie says "Wah! Very delicious leh!". That's how overwhelmed it is.

There is no need to frost the side of the cake at all. Sometimes less is more. And that's how I feel.


This makes large cake and good for you to bring it to a party. Please read all the notes and steps that I've written. Those details are there for a reason.

Ingredients
  • 250g Salted Butter, room temperature
  • 5 Eggs, large sized and in room temperature
  • 150g + 50g Castor Sugar
  • 200g Self Raising Flour
  • 1/4 tsp Baking Powder
  • 1/4 tsp Bicarbonate Soda
  • 1 tsp Extra Virgin Coconut Oil (Optional) 
  • 50ml Coconut Cream
  • 20ml Concentrated Pandan Juice *See Preparation Note
  • 25g Desiccated Coconut
Whipped Cream Topping
  • 1 tsp Corn Flour
  • 1 tbsp Water
  • 1.5 tsp Castor Sugar 
  • 100ml Dairy Whipping Cream
  • 50ml Coconut Cream
  • some grated fresh and firm coconut flesh
  • some green lime zest
  • some edible sugar flowers as deco (Optional)
Preparation Note
- You will have to prepare the concentrated pandan juice way in advance, at least 5 hours. The reason is because you need time to allow the pandan juice to set before you can get the best out of the best that sunk at the bottom.
  1. Buy a bunch of Pandan Leaves (aka Screwpine Leaves). It cost me about 20cts from the wet market. 
  2. Wash Pandan Leaves clean and snip them into pieces. 
  3. Dump pandan leaves into the juicer, add a cup of water and blits away. 
  4. Strain the pandan juice, covered, and keep them in the fridge to set for few hours. I left mine in the fridge untouched overnight.
  5. When the pandan juice is set, you will see two layers. The dark greenish colored concentrated pandan juice will sink down. That dark green part is the part we want for the cake. 
- Yes. It's tedious to make your own concentrated pandan juice. You can choose to use the bottled  pandan paste that you can conveniently bought it at any Phoon Huat or Supermarket. But you know? It taste different. You can go ahead and use it. The choice is your's.

The dark greenish concentrated Pandan juice sunk at the bottom after it's left in the fridge overnight.

Method - for the Cake
  1. Pre-heat oven at 175 degree, fan OFF. 
  2. Prepare 8 x 8 inch square baking pan. Line the base and the side nicely.
  3. Separate egg whites and yolk 
  4. Sieve flour together with baking powder and bicarb soda.
  5. Mix both concentrated pandan juice and coconut cream together in a small bowl. 
  6. Cream butter and 150g castor sugar until pale and fluffy. Add in extra virgin coconut oil (if you have it), beat for awhile, and followed by adding egg yolks, one at a time. 
  7. Put in half of the sieved flour, mix on low speed until they are half mixed. Add in pandan juice and coconut cream mixture in 2 additions until well incorporated. Mix in the balance flour. As long as the batter is mixed well, stop it. Do not over-work the batter.  
  8. Beat egg whites until soft peaks, gradually add 50g castor sugar in 3 additions until egg whites achieved stiff peak.  
  9. Take 1/3 of the egg whites, fold into the batter. Take another 1/3, and repeat the folding process. 
  10. pour the mixed batter to the balance to the mixing bowl where the balance 1/3 egg whites is. Continue to fold it until well mixed. Be gentle. We need to retain the egg whites bubbles as much as we can. 
  11. Pour batter into the lined pan, level, and bake it for 1 hour or until skewers comes out clean. Leave cake to cool completely, use clingwrap to wrap it well and put them into the fridge overnight to let the whole cake infuse. Butter cake taste better overnight :)
Method - for the Whipping Cream & Decorations
  1. Ensure Whipping Cream is always in chilled condition. This is the first thing you need to check.
  2. In a small saucepot, add in corn flour and water. Stir well on a very low heat. It will turn sticky and gluey very quickly. So, you will have to remove it from the heat once it starts to thickened and quickly pour the thickened corn starch onto the castor sugar. Continue to stir until the castor sugar is melted.
  3. Prepare bowl of ice water, get another clean and dry bowl, sitting on top of the ice water, pour 100ml of whipping cream. Whisk till soft peak.
  4. Add in the thickened corn starch mixture into the whipping cream and continue to whisk till stiff peak is achieved. Keep it in the fridge. 
  5. In another clean and dry bowl, sit on top of the same ice water, whisk 50ml coconut cream till stiff peak.
  6. Take out the whipping cream, combine both whipping cream and coconut cream together, put it back to the fridge for later use.
  7. As part of the delicious topping, I grate some firm coconut flesh coarsely using my microplane, and then sprinkle a tsp of castor sugar on top of the grated coconut. 
  8. Grate some green lime zest to create another level *fwoh* to the overall taste of the cake and it gives nice color contras to the grated coconut too.
  9. To assemble - I want my cake to look clean and showcase the beautiful pandan color of my cake, So, I trim the side of the cake. However, trimming is absolutely optional. Spread the cream on top of the cake generously. Push the cream to the edge, but leaving some space to avoid cream touching the side. Sprinkle grated coconut flesh evenly and top with green lime zest for the color contra. You can stop here, or you can add more decorations if you wants. 
Note : This is a fresh whipping cream with coconut cream. Fresh whipping cream always taste delicious, not as heavy and rich as buttercream, and they are absolutely not as stable as other cream. They must be chilled all the time. I added some corn starch, wanting to delay the melting time of the whipping cream. You can add gelatin of course, but I didn't do that this time. Always remember this point. This whipping cream is NOT stable. Never attempt to put the cake under room temperature and leave it unattended. The whipping cream topping will melt. If you want sturdier cream as topping, then, you have to change the topping recipe to suit your individual preference.

The side of the cake is trimmed to showcase the nice green color. 

Grating my coconut flesh using Microplane. 

And not to forget the nice touch of green lime zest. 

The result of this cake..... Simple, old-fashioned flavor. Combination of Pandan and Coconut, this definitely won't go wrong. Adding Extra Virgin Coconut Oil gives extra flavor to the cake. It's like, instead of adding coconut essence, I would recommend you to add Extra Virgin Coconut Oil. They smells amazing and they are genuine stuff! I use Coconut Oil for cooking too. But if you don't have em' at home, then you can choose not to add. It makes no sense for you to buy a bottle of Coconut Oil just because you wanna use 1 tsp for this cake.


I like my cake to be less complicated and unpretentious. Although cake decorations will create good impression to your guests and wow them, but the cake must be delicious! Good flavor and texture must be the first priority! Share this recipe if you agree with me. Hahah.

I love the topping. The white snow flakes melting away, the greens came alive. It's like... Winter turning into Spring! How lovely!


 Look at this beautiful white hair auntie. She's 84 this year. Her sweet smiles melts my heart away :)


As long as the fellow seniors are happy, my effort is worth it for sure :)

Happy Baking everyone!

Beef Brisket Clear Soup Stew / 清湯牛腩

$
0
0
Beef Brisket Clear Soup Stew is a very popular Cantonese dish. Sweet and beefy in taste, soft and tender meat and clear soup with hints of spices. It may looked like a normal dish, the scent and fragrance of the soup from hours of simmering is lip-smackingly delicious.

Undeniably, the clear beef brisket soup has such a strong umami flavor that you cannot resist but finish it to the last drop.


In my hometown Kampar, we do have this soup serve alongside with dry noodles. In Hong Kong, this dish is easily available, especially the famous Kau Kee Beef Brisket Soup Noodles. Asians have plenty of ways of cooking their version of 'beef stew' or 'beef soup', while Cantonese prefers this clear soup version. However, different family will have different preference in the type of spices added into the soup.


I stewed this pot, and I served 6 adults along with fluffy white rice. Yumms!

Ingredients
(Source : Chinese Food Recipe with modification)
  • 650g Beef Brisket 牛腩
  • 200g Beef Shin 牛腱
  • 6 Water Chestnut (Optional) 马蹄
  • 10 Beef Balls (Optional) 牛肉丸
  • 1 White Radish 白萝卜
  • 1 tbsp Shao Xing Wine 绍兴酒
  • 2 stalks Spring Onions 葱
  • 40g Old Ginger, sliced 老姜
  • 2500ml Water 水
  • Sea Salt to taste 海盐
Spices for the soup
  • 1 Bay Leaf 香叶
  • 10g Rock Sugar 冰糖
  • 1/2 tsp Fennel Seed 小茴香
  • 1/2 Szechuan Pepper 川椒
  • 1 Cinnamon Bark 桂皮
  • 4 Cloves 丁香
  • 2 Star Anise 八角
  • 1 piece Licorice Root 甘草
  • thumb sized Sun-Dried Tangerine Peel 老陈皮
Method
  1. Preparation - Cut meat into pieces and white radish into big chunks. Give the spices a quick rinse. Soak tangerine peel till soft, scrape off the whitish part. 
  2. Bring a large saucepan of water to the boil. Add brisket and shin into the boiling water, simmer for 5 minutes. Remove from the heat, drained, rinse the beef pieces and the saucepan to get rid of the scums. 
  3. Heat a pan with some oil, fry sliced gingers till fragrant. Add in the rest of the spices, shao xing wine, rock sugar, beef brisket and beef shin. Stir well. Add in water and bring to a boil. 
  4. Turn the heat to low and simmer for 30mins, scoop the scums away (if any) and add in 1 stalk of spring onions. 
  5. Add in white radish and beef balls, continue to simmer under low fire for another 30mins (or more), covered. Check the tenderness of the beef brisket and beef shin to your likeliness
  6. Turn off the heat, add salt to taste. Let the soup continue to 'cook' under it's own temperature, for another 30mins.
  7. To serve, reheat the soup, scoop onto the bowl, sprinkle spring onions and serve with fluffy white rice.
This recipe is very forgiving. You can choose to use only beef brisket if you doesn't like beef shin. I added some beef balls into the stew because my big boy Max would love to have em'. Water chestnut can add extra sweetness to the stew. I happened to have some at home, so, I just conveniently add some in there.


I got my beef brisket, beef shin and beef balls from Chinatown wet market. Beef brisket cost S$10 per kg. Good deal eh.

The variety of spices I used is quite alot. But if you don't have all of them in the list, you can opt out some of them. However, ginger, spring onions, szechuan pepper, rock sugar, tangerine peels are essential. Otherwise, you won't be able to get even the right flavorful taste of the broth.

I didn't remove the ginger skin. Ginger and ginger skin has health benefits. I'm sure very little people knows that leaving the skin on your ginger is better for you. Ginger skin doesn't only makes the dish taste better, it aids in digestion by improving absorption of essential nutrients and helps to break down the proteins in your food. Of course, for some cosmetic reasons on certain dishes, I will still remove the ginger skin :)


Fusing with the lean meat into one, the brisket has generated a heavenly consistency. I brewed the soup for 30mins, and the flavor of the spices is all over the soup. I don't the spices to over-powered and covered the beefy taste, because beefy sweetness is eventually what we want. So, I removed the strong flavored spices star anise, cinnamon bark, cloves and licorice root from the soup. You can also do the same or if you prefer stronger spices flavor, you can leave the spices in the soup all the way.


Now, I am able to make this beef brisket clear soup stew at home anytime. To me, the best part about cooking is that you are willing to make something from scratch, and your loved ones enjoy eating it.


I find this soup absolutely suitable for all-year-round dish. The soup is clean, slightly sweet, intensely beefy. Surely will cook it again in near future.


What's next for me to explore? I don't know. I shall think about it :)

Happy cooking!

Corn Chowder (玉米浓汤)

$
0
0
Corn Chowder is one of the ultimate comfort food. I had been cooking this soup for many times and I never gets tired of it. I guarantee you, this hearty home-made bowl of soul is easy and delicious.


Since my whole family loves this soup, I see no reason for not sharing this recipe. This recipe makes super comforting chowder and it's easier than you think to make. This Corn Chowder soup doesn't use milk, flour and corn starch. The starchy and the thickness comes from the potatoes. It's real stuff.


If you wants to make it more of a meal, you can add abit of fish or seafood in it. Probably crab meat, chunks of prawns, or even smoked fish.

This recipe feeds 4 soup portion. But if you are adding some seafood chunks, this recipe serves 3 as a meal.

Ingredients
  • 1 pack Sweet Corn Whole Kernels (380g). ** SEE NOTE
  • 2 Big Russet Potatoes, diced ** SEE NOTE
  • 1 Big Yellow Onions, chopped
  • 200g Bacon (about 8 slices)
  • 400ml Chicken Stock ** SEE NOTE
  • 200ml Water
  • 50g Butter
  • 100ml + 50ml Whipping Cream
  • 1 Fresh Red Chilli, finely chopped (optional) ** SEE NOTE
  • Salt to taste
  • Pepper to taste
  • Some chopped parsley for garnishing
Note :
1. Sweet Corn Kernels might be in a pack or in a can. No specific brand required. I use Del-Monte is because the packing is easy to open. This brings laziness to the next level. Haha... Anyway, you just have to be more alert when you purchase it. There's sweet corn whole kernels and sweet corn cream style. Don't get the wrong one. If you want, you can use fresh sweet corn and cut the kernels on your own. But taste result will vary. Frozen corn kernels might be a good alternative too.

2. If your potatoes are too small, use 3 potatoes instead of 2.

3. It's undeniably that chicken stock gives better flavor to the soup. But if you don't have chicken stock at home and you are not fussy about it, you could just use water. The existence of rendered bacon gives good flavor to the soup too.

4. Adding red chilli in the chowder will surprise you. I always do that. Chilli in the soup will bring your overall corn chowder taste to another new level. But for this particular time, I forgot about my chilli. I only realize my red chilli still sitting in the fridge AFTER I finished cooking my corn chowder! *Grrrrr!!*  If you are feeding kids, and worrying the existence of the chilli, then, you can choose not to add them in.

Method
  1. Prepare all the ingredients - Chop yellow onions, dice potatoes, cut bacon into small pieces, remove seeds from chilli and finely chopped them. 
  2. A tablespoon of cooking oil (or lard if you have some at home) on the saucepot, throw in all the bacon pieces. Let it render under low flame, stirring it occasionally to prevent sticking at the bottom, otherwise it will get burnt easily. Render until all bacon pieces are all brown and crispy. Refer to picture. Remove some bacon bits from the saucepot, set aside for topping later. Leave the rest in the saucepot. 
  3. Add chopped onions into the saucepot and cook together with the bacon pieces under medium low fire, stir well, let it cook until onions are fragrant and soft. 
  4. Set aside 1/4 portion of sweet corn kernels aside. Pour the balance 3/4 sweet corn, chopped red chilli and diced potatoes into the saucepot. Stir well and cook for about 5 mins. 
  5. Add in 400ml chicken stock (or water). Once it is boiled, let it simmer under medium low fire for about 8 mins.
  6. Pour the soup into the blender and blend until smooth. You can roughly blend them if you prefer the less smooth soup texture. Pour the blended soup into a pot. Add 200ml water into the blender to 'rinse' the balance soup in the blender. Pour it back to the pot. No waste. Add in the remaining 1/4 sweet corn kernels. Stir. Let it simmer under dead low fire for another 5 mins. You have to keep stirring the soup so the soup doesn't stick to the pot.
  7. Add in 100ml whipping cream, salt and pepper. Stir and taste. 
  8. At this point of time, go whip up 50ml chilled whipping cream until stiff peak, keep it in the fridge for later use. However, this is absolutely optional. You can do away without whipped cream topping if you want it less fancy.
  9. To serve - Reheat the soup. Add in 50g Butter and give it a good stir. The butter will give the soup a very good gloss and nice buttery fragrant that you won't be able to resist. Top with whipped cream, chopped parsley and crunchy bacon bits. 
Ingredients are easily available at the supermarket. This corn chowder is absolutely fuss free.


Rendering bacon pieces under low flame. This takes abit of patience. Please ensure that you are stirring it occasionally to prevent from sticking at the bottom and ensure every bacon piece are well cooked. I use lard in replace of cooking oil. I love lard. It gives really good flavor.


Render Bacon pieces, add in chopped onions. Add in diced potatoes and corn kernels, add chicken stock, and simmer away. It's easy and it's not difficult to follow when there's photo shown here.


Next, blend the soup into smooth texture, add cream and butter. That's it. Easy.


As I mentioned above, to make it a meal, you can add seafood into the soup. And Oh.. don't forget to grab some bread to go along with. What you see here is a good combination of Corn Chowder, Romaine Walnut Salad, Nordic Sourdough with butter, and some chips to go along. This is my weekend lunch! Mad love!!!!


You could tweak the recipe by adding extra diced potatoes onto the blended soup, give it a good 5mins slow simmer before adding the cream. Leave it there untouched. The diced potatoes will soften by the remaining heat from the soup. This way, your chowder will good chunk of potatoes bites.

Maybe this recipe can be a generic recipe across other soups or chowder as well. Just replace corn kernels with leek and some celery, you will have Leek Soup. Replace corn kernels with fresh peas, and you will have peas soup.  It doesn't matter. The idea is really to be as hearty and as homely as possible. Right?


You know what? I hate it when some western-food-wannabe casual dining place serves me f**ked-up canned soup diluted with water and thickened it with corn starch. Urghh!!!

No more canned soup. Eat the real stuff. Try cooking corn chowder at home now!!!

Master Class with BBC Celebrity Chef Rachel Allen

$
0
0
A great start to the weekend comes in the form of fun bakes with Rachel Allen.

Collaborating with BBC Lifestyle, Rachel Allen is visiting Singapore for the 5th time and I'm honored to receive an exclusive media invite by BBC Channel to attend cooking master class with BBC Lifestyle conducted by her.

BBC Celebrity Chef Rachel Allen returns to TV screens on BBC Lifestyle (Starhub Channel 432) with a new series - Rachel Allen: All Things Sweet - as she indulges in her passion for delectable desserts.


BBC Celebrity Chef Rachel Allen returns to TV screens on BBC Lifestyle (Starhub Channel 432) with a new series - Rachel Allen: All Things Sweet - as she indulges in her passion for delectable desserts.


She recreates mouth-watering morsels from her same-titled cookbook and shares some sweet-making secrets in the class. The recipe in the class is flavor-filled Banana, Ginger and Golden Syrup Bread, and Chocolate Peanut Brittle Butter Cookies.

I brought Kattie along as I knew she will enjoy the fun. And indeed she is. She is so hyped throughout the class and cracked good jokes too. Chef Rachel recognized her as the 'relaxed assistant' as what Kattie named herself. This Irish TV chef is quite a fun person.


All thanks to Palate Sensations for the nice and fully equipped kitchen. Everything was nicely arranged upon our arrival. All we need to do is to whip away with the flow.


The recipe is not difficult to follow. The Banana Bread is just mix, pour over, and bake. Result is really nice. The whole kitchen smells so good. Look at this happy girl with her bakes.


My favorite part is the crunchy peanut brittle. Kattie did it very well. The peanut brittle was nicely and evenly coated with caramelized sugar.


I can't tell you how much love I had for those caramelized crunchy peanut brittle. I had been eating em' while the butter cookies still baking in the oven. I don't think I can wait. Haha..


When I popped some peanut brittle into my mouth, I told Chef Rachel that "Kitchen is how kitchen supposed to be like". She laughed and she popped some into her mouth too. 

This is the end result baked by Chef Rachel. The ginger taste is at the strong side. It needs to be reduced slightly as the ginger powder in Asia is probably stronger than those in UK.


This Chocolate Peanut Brittle Butter Cookies. Too good and too addictive. I feels like Christmas!


From impressive afternoon tea goodies to irresistible treats for the little ones, I believe Chef Rachel Allen's All Things Sweet cooking tips will entice to rediscover the joy of baking. Probably I should take a look at her cookbook soon.


There's always room for something sweet :)

All thanks to BBC Channel and Palate Sensation for the hospitality. We had fun and we had a great experience.

Strawberry Peppermint Tart

$
0
0
There are times when all that matters is creating something glamorous. A little red dress instead of a black ones. Abit of lace peeking out, that sparky eye-shadow and lots of lip gloss. 

You might not know what I'm talking about, but when you look at this picture, I know you do. I'm talking about this Sexy Strawberry Peppermint Tart.


It's Christmas, and I thought, this is the right time to share this recipe. Christmas is about Red, and that little Green in-between. 

I've come up with my own version of Strawberry Peppermint Tart that I adore recently. It's light, refreshing and with that sweetness in-between the tang. I've spent quite sometime to come up with this favorite combination tart of my own and I come to a realization that different individual appreciate different type of layering combination.

I'm anal. I prefer mine. Sexy. Delicious!


When I create this Strawberry Tart, I imagined that I want my Strawberry Tart to have the kind of Strawberry overload succulence explodes in my mouth, the cheese layer melts away in my mouth like butter. And oh, I want that cakey layer too, but not heavy, and the combination taste must be nothing short of heaven. 

So, here, with all my cookbook readings and online readings, I've come up with my own favorite Strawberry Peppermint Tart. But I won't pretend to tell you that this is easy. The difficult part is not the tart making. The difficult part is to gather all the ingredients and to get the nicest Strawberries for the tart. 

I used 6 Inch Tart Tin (Gobel Brand), Made in France. Got it from Tott Store at S$26. If you are making bigger tart, you can double up the recipe accordingly. 

Ingredients

for the Tart Crust
  • 90g Cold Unsalted Butter, cubed
  • 150g Cake Flour
  • 45g Icing Sugar
  • 2 Egg Yolk
  • Pinch of Salt
for the Almond Filling
  • 40g Unsalted Butter
  • 30g Icing Sugar
  • 1 Egg
  • 1/2 tsp Corn Starch
  • 40g Almond Powder
  • 1 drop of Vanilla Extract
for the Cream Cheese Layer
  • 125g Cream Cheese, room temperature
  • 20g Unsalted Butter, room temperature
  • 25g Icing Sugar
  • 15g Fresh Lemon Juice
  • 50g Creme Fraiche
  • 4 tbsp Good Quality Strawberry Jam
for the Strawberries Layer
  • 30 to 35 Fresh Strawberries (I used Organic Strawberries from USA)
  • 4 tbsp Mirror Gel 
  • 3 tbsp Water
  • Few drops of Peppermint Extract
  • Some Fresh Mint Leaves
Method - for the Tart Crust & Almond Filling
  1. Blitz Tart Crust ingredients in a food processor till crumbly. Pour the crumbs on a double layered clingwrap, wrap them up into a ball shape. Use your hand, give them a few press until the crumbs are well combined into a pastry dough. Do not overwork the pastry.
  2. Roll the pastry into a round 8 inch shape with the aid of the clingwraps to prevent pastry from sticking to the rolling pin and working top. 
  3. Wrap rolled pastry well with clingwrap, and put the pastry into the fridge for 1 hour. 
  4. Remove pastry from fridge, remove the clingwrap, press the tart crust into the tart mold evenly with your fingertip. Do not panic if the pastry cracked. Just cut the excess pastry at the side of the tart and patch it on the cracked side. It's like playdoh. This tart crust pastry is very forgiving. Just shape the tart crust until you are happy with the thickness and prick the tart crust bottom with a fork to finish. 
  5. For the almond filling, combine all almond filling ingredients in a food processor. Blitz until everything comes together, and it is ready to spread on top of the tart crust. 
  6. Bake the tart crust with almond filling in the pre-heated oven at 175 Degree Celsius for about 23 to 25 mins. Remove from the oven and let the tart cool down. 
Method - for the Cream Cheese Layer 
  1. In a big bowl, mix all Cream Cheese layer ingredients together until combined. Spread the cream cheese mixture on top of the cooled tart. 
  2. Spread a layer of good quality strawberry jam on top of the cream cheese layer. if you are lazy, you can also mix the strawberry jam with the cream cheese. But your cream cheese layer will be softer. 
Method - for the Strawberries Layer
  1. Ensure Strawberries are washed, hulled and dried with kitchen towel. 
  2. To glaze, mix Mirror Gel, Water, and Peppermint Extract in a big bowl. Put the Strawberries in and give it a toss. Ensure Strawberries are all well coated with the glaze.
  3. Arrange glazed strawberries on top of the tart evenly. Make sure strawberries are standing straight, tall, and proud. Make sure strawberries are arranged to the rim of the tart. Make it full!
  4. Brush more mirror gel mixture on top of the arranged strawberries to give it a nicer gloss. Put the tart into a container, covered well, and let the tart sit in the fridge to set for about 4 hours. 
  5. For finishing touch, arrange some fresh mint leaves on top before serving. 
I've did quite a few attempt. I tried to remove the almond filling layer, and double up the Cream Cheese filling. It's a crowd pleaser! But tart crust might crack during baking process. To salvage it, Alan recommend me to apply a layer of chocolate on the tart crust to secure it. Like that, my Strawberry tart will be fully cream cheese base and with that hint of chocolate. It's nice. Many people loves it.  

But I personally still prefer the version with almond filling in it. Because almond filling gives another level of distinctive flavor to the overall taste of the tart. And also, with the almond filling, I have no worries if my tart crust will crack or not during baking process. It will hold together. Very safe. 

Do take note that different type of strawberries gives different results in overall taste. My take is, if you are putting in so much effort to make this Strawberry Tart to impress your loved ones, you don't be stingy. Good ingredients gives you good quality tart. 

Now, let's take a look at the layers. It has thin layer of tart crust, a layer of almond filling, a layer of cream cheese filling, a layer of strawberry jam, and then, the fresh organic strawberries coated with peppermint glaze, and oh... that touch of green mint leaves. 


The tart has it's refreshing Peppermint moist, that cakey almond layer, and that creamy richness, while the strawberries are plump and juicy. One bite on it, it all mixes together to make a decadent scrumptious slice of heaven. 

Before you complaint about how expensive those ingredients are to make this Strawberry tart, ask yourself. How much are you willing to pay for a slice of Strawberry tart that looked like this at Fruit Paradise? Think again :)


I think I've had enough of describing how much I love Strawberry Peppermint Tart. It's Christmas! It must be Peppermint! 


When I'm looking at my Strawberry Tart, it's like, that little red dress fits you oh, so perfectly.


It's pure indulgence, pure pleasure. And this is the kind of pleasure you can create at home freely and share the joy with your friends and relatives. 

I hope you like it. And Merry Christmas to everyone!

Hong Kong Royal Chicken / 香港贵妃鸡

$
0
0
Happy New Year to everyone! It's a brand new year for 2016 and CNY is just around the corner. I think it's the right time for me to share my Hong Kong Royal Chicken recipe.

Tender chicken piece with some gelatinous layer in-between. Salty, with a hint of angelica root. The existence of Cekur, Turmeric and Spring Onion on the water bath injected all the flavors into the chicken and gives really good flavor. A dish that looked simple, but yet requires every details to be followed to ensure it's success.


Chinese New Year is just a month away and I would like to share with you Hong Kong Royal Chicken (香港贵妃鸡) recipe which I think it is ideal as part of the CNY dish served during Chinese New Year dinner.


During my previous trip to Hong Kong last year Jan'15, I had Gui Fei Chicken in Hong Kong Tasty Congee Noodle Wantun Shop 正斗粥麵專家, it was really good. I like it. So, I decided to replicate it at home. But the one in Hong Kong is dried version. The one I've re-created is with sauce. I like the idea of having sauce. If you are unsure with the sauce, you could always serve the sauce separately.

The chicken dish on the picture above is showing half chicken only. I save the other half for the next meal.

My mom did this once, many years back. She gave me quite a number of tips to ensure I didn't go wrong. These are the tips :
  1. Cekur (沙姜 Sand Ginger) is a must. Do not replace with Cekur powder or ordinary ginger. They are different. 
  2. Turmeric (黄姜) is also a must. Do not replace with Turmeric powder. 
  3. Choose a nice chicken for this dish. Even if you have to pay more for the chicken.
Ingredients
(Source : Harvest Rich Recipe Book, with modification)
  • 1 Fresh Chicken, preferably Kampong Chicken (est. 1.3kg) 甘榜鸡
  • 60g Cekor Ginger 沙姜
  • 15g Turmeric 黄姜
  • 5g Angelica Root 当归
  • 2.4L Water, or more 水
  • 75g Sea Salt 海盐
  • 2 + 2 tbsp Rose Wine 玫瑰露酒
  • 1 tsp Sugar 糖
  • 1 Sprig Spring Onions 青葱 
  • 5g Goji Berries / Wolfberries 枸杞子
Turmeric is easily available at the wet market. But not all wet market sells Cekor Ginger. I got mine at Tekka Market, where they sell all sorts of spices to cater for Indian and Malay cooking. I love Tekka Market :)

For the water, you just need to make sure that you have enough water to cover the chicken, Probably 2.3L to 2.5L, depends on the size of your pot.

Method
  1. Wash and trim away visible fats from the chicken. Chop away the chicken feet. Set aside for later use.
  2. In a slim and tall pot that can fit in a chicken nicely, fill with water, dissolve salt in water, add in Cekor Ginger, Turmeric, Angelica Root, 2 tbsp Rose Wine and Sugar, Bring to boil. Switch to low heat and continue boiling for 15mins.
  3. Once water is boiled for 15mins, the water should have been infused. Hold the chicken head (refer to photo), soak the chicken body into the boiling water. With your hand still holding the chicken head, lift the chicken up, and soak it into the boiling water again. Do this for 4 times before you release the chicken head and let the chicken submerge into the water completely. By doing this, water will go into the chicken cavity, and hence, the whole chicken will be well cooked. Water level must completely cover the chicken.
  4. Immediately turn the fire into dead low and slow, lids on, and leave it there for 5mins. Remember to set timer. Do not go over 5 mins. 
  5. After 5 mins, heat off. Leave it there untouched. Set timer for 50mins (for 1.3kg chicken). Walk out of the kitchen and go watch your TV show. If your chicken is 1.7kg or anything bigger, please make it 1 hour and 10mins or so. You have to gauge the time yourself. For 1.6kg chicken, it would be about 1 hour.
  6. Use a pair of chopsticks, carefully and gently remove the chicken from the pot and place the chicken to the big tub, and fill with running tap water to cool down the chicken. Try your best not to bruise or tear the chicken skin. We need the chicken to have nice appearance.
  7. When the chicken is cooled down abit on the surface, put the chicken into a tub of ice-cold water to further cooling process until chicken turned room temperature inside out. Drain.
  8. Chop chicken accordingly and arrange it nicely on a plate.
  9. For the sauce, pour 2 tbsp Rose Wine and add Goji Berries into half bowl of stewed soup (the water that you used to cook the chicken), pour it on a separate saucepot, bring to a boil. Give it a taste to ensure the saltiness is right, or adjust it accordingly. Thicken the gravy with tapioca starch. Pour the gravy on the chopped chicken. Garnish with Spring Onions and serve.
You don't have to remove the skin for both Cekur and Turmeric. It is fine to leave the skin on, just remove the dirts if any. Shaving off the skin is just for cosmetical appearance only.
 

I used 菜园鸡 (Veggies Farm Chicken), which is widely available in Malaysia. I'm happy with it.


As advised by my mom, I adapted the recipe from a recipe book "Harvest Rich" by Choong Su Yin, and modified it accordingly. This is how the chicken dish looked like in the recipe book. The chicken looked really yellow, which I don't think the amount of Turmeric indicated on the recipe book gives this result. And the recipe book asked for 150g Salt that makes my jaw dropped.


Anyway, I'm happy with the result. My husband love this dish. Although this dish is not difficult to make, but there's quite a number of steps needs to be noted and not to be missed.


I hope you like this dish.

祝大家新年快乐,万事如意!

You may also like : Hakka Steamed Salted Chicken / 客家蒸盐鸡

Hakka Simmered Pork Belly with Preserved Mustard Green / (客家梅菜焖猪肉)

$
0
0
This is one of my maternal Grandma's favorite dish that she always cook for us. She's Hakka, Hor Por Clan (河婆客家) and she's one real traditional cook! I always have fond memories over this traditional 梅菜焖猪肉 Hakka Simmered Pork Belly with Mui Choy (a.k.a Preserved Mustard Green) dish.


In Hakka dishes, there are 3 elements - Salty, Fatty, and most importantly, Fragrant. 

When I was small, due to my parents working schedule, I grew up under my maternal Grandma's care. I was heavily inspired by my grandma's simplicity in life. My grandma's dishes isn't fancy. They are classic, traditional, very flavorful, and surprisingly, no one ever complaint about her repeating same dishes even if it is quite often. I can talk about my grandma's dishes for 3 days 3 nights and I'm not sick about it. That's how close we are to each other. 


We grew up eating this. So, my mom could whip up this dish very well too. Before I replicate this dish at home, I called mom to confirm certain details to ensure I didn't screw this dish up. I'm cooking this for my Mother-In-Law who's a big fan of Mui Choy (a.k.a Preserved Mustard Green).

This dish involves two types of Mui Choy. Sweet Mui Choy (甜梅菜) and Salted Mui Choy (咸梅菜). Don't ask me if you can use only Sweet Mui Choy or only Salted Mui Choy. This dish needs both Salted and Sweet Mui Choy combined together to achieve the right balanced taste.

My mom says, this dish can go with or without Ginger. For usual day to day cooking, ginger can be skipped. This version, ginger is added and hence, this dish is suitable for confinement mums as part of the confinement menu. If you are ginger haters, skip the ginger. Simple as that.

Ingredients
(Source: My late Grandma Mdm. Chong and My mother - Mdm Chai)
  • 400g Pork Belly, with skin (五花肉, 连皮)
  • 100g Sweet Mui Choy (甜梅菜)
  • 150g Salted Mui Choy (咸梅菜)
  • 3 tbsp Pork Lard with Lard Bits (猪油 + 猪油渣)
  • 4 to 5 slices Ginger, julienned (姜)
  • 7 to 8 cloves Garlic, slice half, leave the other half whole (蒜头)
  • 400ml Water (水)
  • ½ tbsp Oyster Sauce (蚝油) *See Note
  • 1½ tbsp Soy Sauce (酱油)
  • ½ tsp Pepper (胡椒粉)
  • ½ tsp Sesame Oil (麻油)
  • 15g Rock Sugar (冰糖)
Note : 
My grandma didn't use Oyster Sauce when she cook this dish. My mom improvised this dish to make it even tastier by adding half a tbsp of Oyster Sauce at later days.

Life was so much simpler during childhood times where we only have very little condiments. Pigs were locally farmed, and pigs are fed with grains that is almost organic. Meat taste more porky and delicious too. So, it's the change in society that makes recipe change? I'm not sure, but I think it's not difficult to understand :)

Method 
  • Heat up wok WITHOUT any oil. Add in chopped Mui Choy, julienned ginger, and whole cloves garlic. Stir fry in medium heat until you can smell the Mui Choy aroma, and it looked dry. Dish up and set aside.
  • With the same wok, heat up 3 tbsp Pork Lard with Lard Bits.When you can smell the pork lard, add in sliced garlic, garlic cloves from the Mui Choy and fry till fragrant and garlic looked slightly yellow. 
  • Add in pork pieces, increase the heat slightly, stir fry the pork for awhile until the pork set its shape and almost cooked.
  • Add in Mui Choy and Rock Sugar. Fry for awhile, add water, oyster sauce, soy sauce, pepper and sesame oil. Stir well and bring to a boil. 
  • Under low heat, let it simmer for 20 to 25mins and the dish is ready. After simmering for 20mins the sauce for this dish remain minimum. Refer to photos below. 
  • For tastier result, cook this dish a day in advance. (Read on)

Two important point that I need you to take note while you prepare this dish.

One - Both Sweet and Salted Mui Choy must be washed, separately soaked with water for 20mins to reduce saltiness, rinse again, squeeze dry, and then cut them finely. Refer to photos below.

Two - This is traditional dish. My grandma uses Pork Lard. I follow. Never fear of eating Pork Lard. They are natural oil. Do prepare some at home, put it in the container and store it in the fridge. I always separate my Pork Lard and Crispy Lard Bits separately. But if you really don't have time to render your own Pork Lard, then too bad for you. You may use good quality Peanut Oil tho. But to be honest, sometimes Pork Lard's aroma is irreplaceable. Haha...


Prepare everything before you heat the wok. General Rule... 


Dry frying Mui Choy with ginger and garlic cloves is to bring out the Mui Choy flavor and remove some unwanted preserved smell on the Mui Choy.

By looking at these pictures, I'm sure this is quite clear on how this dish is cooked.


Look at above photo, 400ml water, simmered for 20mins and these are the leftover sauce for this dish. Never waste a drip of these goodness. This sauce makes you eat another bowl of rice. 


Usually, I cook this portion, half portion eat fresh, and keep the remaining half for tomorrow. This dish keeps well for upto 3 days in the fridge, and probably 12 days in the freezer. And I swear that it taste so so so soooo much better on the next day.


I refused to let tradition dies off. I probably will hate myself if I don't jot down this recipe and share with everyone. Sometimes, such simple dish is the only thing that make your family member come home early for you. Like if you agree! :)

P/s. My Mother-In-Law ate alot of rice because of this dish. Haha...


I would also suggest you to take a look at my another two Hakka Style Braised Pork Belly dishes

Hakka Braised Pork Belly with Dried Cuttlefish (吊片焖花腩)

$
0
0
Hakka cuisine may be described as outwardly simple, but tasty. The ingredients are generally seasonally available in the market. Pragmatic and simple.

This is another Hakka Style Braised Pork Belly dish. Hakka Braised Pork Belly with Dried Cuttlefish (吊片焖花腩). This recipe has some similarity to my previous Hakka Simmered Pork Belly with Preserved Mustard Green (客家梅菜焖猪肉), but this one taste more Umami. The skill in Hakka cuisine lies in the ability to cook meat thoroughly without hardening it, and to bring out the proteinous flavor (Umami Taste) of the meat.


My late father loves this dish so so so much. He always be home early when he knew my mom is going to cook this dish for dinner. Whenever I cook this dish, I will think of my dad's smile and how he ask my mom to scoop another bowl of rice for him.


It's a sad thing that not many younger generations know this dish. I asked a few youngsters few days ago, they didn't know it actually exist. I hope this dish can be recreated again and again and again by other families and bring the Hakka traditions back to the dining table.

Ingredients
(Source: My late Grandma Mdm. Chong and My mother - Mdm Chai)
  • 500g Pork Belly, with skin (五花肉, 连皮)
  • 100g Dried Cuttlefish Strips (吊片丝/鱿鱼干丝)
  • 3 tbsp Pork Lard with Lard Bits (猪油 + 猪油渣)
  • 8 cloves Garlic, cut into half (蒜头)
  • 2 shallot, sliced (小葱头)
  • 2 slices Ginger, julienned (姜)
  • 700ml Water (水)
  • 1 tbso Shao Xing Wine (绍兴酒/花雕酒)
  • 1 tbsp Oyster Sauce (蚝油) *See Note
  • 1½ tbsp Soy Sauce (酱油)
  • 1 tbsp Dark Soy Sauce (黑酱油)
  • 20g Rock Sugar (冰糖)
Note : 
My grandma didn't use Oyster Sauce when she cook this dish. My mom improvised this dish to make it even tastier by adding half a tbsp of Oyster Sauce at later days.

Life was so much simpler during childhood times where we only have very little condiments. Pigs were locally farmed, and pigs are fed with grains that is almost organic. Meat taste more porky and delicious too. So, it's the change in society that makes recipe change? I'm not sure, but I think it's not difficult to understand :)

Preparation
  • Rinse dried cuttlefish strips and soak dried cuttlefish strips in 700ml water for 20mins. Remove soaked cuttlefish strips and reserve the 700ml water for later use.
  • Cut pork belly into bite size.
  • Slice shallots, julienned ginger, and cut garlic cloves into half.

Method 
  • Heat up wok WITHOUT oil. Add in cuttlefish strips and julienned ginger, stir fry on medium heat until cuttlefish aroma comes out, and looked abit dry. Dish up and set aside.
  • With the same wok, heat up 3 tbsp Pork Lard with Lard Bits. When you can smell the pork lard aroma, add in sliced shallot, garlic cloves and fry till fragrant. The garlic looked slightly yellow. 
  • Add in pork belly pieces, increase the heat slightly, stir fry the pork for awhile until the pork set its shape and almost cooked.
  • Add in cuttlefish strips and Rock Sugar. Fry for awhile, add water, oyster sauce, dark soy sauce and soy sauce. Stir well and bring to a boil. (Tips : Once it is boiled, you may go ahead to transfer the dish to a claypot for further simmering. I did that. But this step is optional)
  • Covered, lower heat and simmer for approximately 45mins until the pork pieces are tender and the flavor has been absorbed, or until the gravy is almost absorbed. Scatter Shao Xing Wine, mix well, let it simmer for another minute and its ready to dish up.
  • For tastier result, cook this dish a day in advance. (Read on)
Dried cuttlefish were sold in two forms. The whole dried cuttlefish is commonly sold in the market generally for brewing soups. The dried cuttlefish strips were sold in a pack to ease the convenience of consumers to snip their own strips at home. Dried cuttlefish strips generally used to cook dishes like stir-fry or steamed pork patty.

Save the hassle. Just buy the dried cuttlefish strips and your job would be so much easier. I bought my dried cuttlefish strips from Japan during my trip to Osaka last year. It taste so so so good! Haha.


Here's the picture tutorial :

This dish is the same as my previous braised pork belly dish. I cook this portion, half portion eat fresh, and keep the remaining half for tomorrow. This dish keeps well for upto 3 days in the fridge, and probably 12 days in the freezer. And I swear that it taste so so so soooo much better on the next day.

Yumms!! Two bowls of rice please!!!


I would also suggest you to take a look at my another two Hakka Style Braised Pork Belly dishes


Happy cooking!
Viewing all 110 articles
Browse latest View live